Brunched up grapefruit

When you think about brunch, the first thing you may consider is what restaurant you’ll be dining at. I want you to consider something else: having brunch at home. There are definite benefits to this, including being able to enjoy brunch in your coziest pajamas.

A well-rounded brunch will include some fruits and veggies, and you could go with the always popular fruit salad, but I want to suggest a dish that is so much more elegant: brunched up grapefruit.

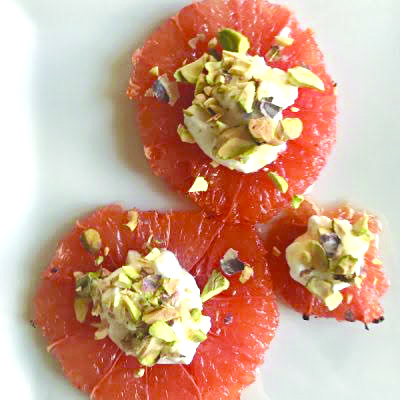
Many a brunch includes halved grapefruits. This dish takes that idea and adds a few levels of elegance. First, this grapefruit is served with the rind removed, so there’s no awkward digging with a spoon while juice squirts into your eye. Second, each slice is broiled with a pinch of sugar to provide a melding of sweet and sour. Third, the fruit is then topped with silky yogurt and crunchy (and salted) pistachios, as well as a drizzle of honey. It’s a carnival of flavors and textures.

Best of all, this grapefruit has a beautiful presentation but takes all of (maybe) 15 minutes to make. Get your guest list ready and finish creating the menu. I see a delicious brunch in your future!

Brunched up grapefruit
Serves 6

3 large red grapefruit
1 Tablespoon granulated sugar
1/2 cup roasted & salted pistachios
3/4 cup plain Greek yogurt
Honey

Preheat broiler.
Line a baking sheet with foil.
Slice grapefruit into ¼- to ½-inch slices, width-wise.
Remove rind from each slice using a paring knife.
Transfer slices to foil-lined baking sheet using a spatula. (They are very delicate)
Sprinkle each slice with a small amount of sugar.
Place baking sheet approximately 4 inches under broiler for 5 minutes or until edges are golden.
While grapefruit cooks, chop pistachios into small pieces.
Remove grapefruit from oven.
Divide grapefruit slices between two serving plates.
Top grapefruit with a small dollop of yogurt.
Drizzle honey over yogurt.
Sprinkle with chopped pistachios.
Eat immediately to enjoy the warmth of the grapefruit.

Featured Photo: Brunched up grapefruit. Photo by Michele Pesula Kuegler.

Bourbon simmered apples

It’s cold outside; make your home warmer with this simple apple dish.

This recipe is pretty simple, with some important caveats. Let’s start with ingredients. I recommend using Honeycrisp or Granny Smith apples, as both of them are good baking apples. They will become tender without losing their texture. Use Granny Smith if you prefer more tartness, and use Honeycrisp if you like a bit more sweetness.

Also, this recipe requires only two tablespoons of bourbon. While it is a small amount, it is a key part of this recipe, so be sure to use a bourbon that you would drink as is. You want the apples to be flavored with a bourbon that you enjoy.

Next, let’s talk about the cooking. The instructions note that the apples need five to 10 minutes of sauteing. The amount of time required can vary, depending on the ripeness of the apples and the settings on your stove. Be sure to keep an eye on the apples! Check for fork tenderness every couple minutes so you have apples that are tender but not mushy.

Once the cooking is done you have an extremely versatile dish. These apples are sweet enough that they could be the topping for ice cream or pound cake. They also are savory enough that they could be used as a topping for roast pork or chicken. You could even use these apples as a side dish on their own.

No matter how you choose to use them, they will warm you inside and out!

Bourbon simmered apples
Serves 2

2 Honeycrisp or Granny Smith apples
1 Tablespoon salted butter
3 teaspoons sugar
1 teaspoon cinnamon
2 Tablespoons bourbon

Cut the apples into quarters, and remove cores.
Cut each quarter into 3 or 4 slices; cut each slice in half lengthwise. (The most important thing is to have the slices be similarly sized.)
Heat a large nonstick frying pan over medium heat.
Add butter, stirring until melted.
Add apples to butter, and saute for 5 to 10 minutes, or until barely fork tender
Add cinnamon, sugar and bourbon, tossing constantly to coat.
Remove from heat, and serve immediately.

Photo: Bourbon simmered apples. Photo by Michele Pesula Kuegler.

Overnight apple oatmeal

When I think about breakfast recipes, I usually think about something to make on the weekend, when time doesn’t matter. Perhaps it is a new flavor of sweet roll or maybe a seasonal quick bread. When creating this recipe, however, I had a busy morning in mind, because although it needs a minimum of eight hours of chilling time, the rest of the time — chopping, mixing, and cooking — is a total of maybe 10 minutes.

For a simple recipe, it has a number of ingredients. First, old-fashioned (or rolled) oats are essential. Quick-cooking and instant oats won’t produce the desired texture. Second, you can use sweetened applesauce, but you may need to reduce or eliminate the added sugar. (You can add the sugar at the end so you don’t end up with a too-sweet dish.) Third, you don’t have to use almond milk. You can use another plant-based or even regular milk. I would choose lower-fat and unsweetened versions to keep this recipe nice and healthy. Fourth, the apple choice is up to you. I like Fuji because it has a decent amount of crunch and a bit of sweetness. Pick the apple you like best. Fifth, no matter the apple you choose, don’t peel it. The apple skin will add more vitamins and texture to this dish.

Now, with all of those hints shared, you have an incredibly simple recipe that produces a wonderful winter breakfast. Though it sits in the refrigerator overnight, you heat it before serving. Then you have a warm, hearty and healthy breakfast to get you ready for the cold outdoors. If you prefer your breakfast served cold, this recipe can do that also. Just add the diced apple before serving, then stir and eat.

Overnight apple oatmeal
Serves 2

3/4 cup old-fashioned oats
1 cup natural applesauce
3/4 cup unsweetened almond milk
2 teaspoons sugar
1/2 teaspoon ground cinnamon
1 medium Fuji apple


Combine oats, applesauce, almond milk, sugar and cinnamon in a medium bowl.
Stir well to combine.
Cover and refrigerate for 8 hours or overnight.
Divide oatmeal into two cereal bowls.
Core and dice apple; divide between bowls.
Stir well.
Microwave each bowl for 1 to 2 minutes, stirring at 30-second intervals, until hot.

Photo: Overnight apple oatmeal. Photo by Michele Pesula Kuegler.

Bruschetta with lemon honey ricotta

This recipe makes a simple but incredibly glamorous appetizer. As a bonus, it is an appetizer that is much better when made individually — by the people eating it. All that is required of you, the cook, is to prepare the ingredients and set them in serving dishes. Your guests will transform them from ingredients to a delicious snack.

Although one of the big selling points of this appetizer is the minimal amount of work required, I would be remiss not to tell you how delicious it is. This recipe is a Venn diagram of flavor and texture. It consists of salty, sweet and sour flavors, providing great balance. There are crunchy and creamy textures to make this appetizer even more appealing to your palate.

However, there is one caveat to the making of this bruschetta. You need to use good ricotta. There are two options for good ricotta. One, you can make your own. It may sound daunting; it really isn’t. You can find a simple recipe at my website, thinktasty.com, or elsewhere on the internet. Two, you can find a good cheese shop or Italian grocery store where they sell homemade ricotta. The stuff you find in a grocery store is fine when hidden under sauce or noodles. For this recipe you want better than fine.

Once you have the ricotta (and other ingredients) on hand, all that is required is about 10 minutes’ worth of work. Slice and toast the baguette. Zest and juice the lemon. Stir those items into the ricotta. Put everything on the counter. Let your fellow diners make their snacks!

Bruschetta with lemon honey ricotta
Serves 6

1 crusty baguette, approximately 10.5 ounces
16 ounces ricotta
1 medium lemon
Honey
Sea salt

Preheat oven to 400 degrees.
Cut baguette diagonally into 1/4-inch slices.
Place slices on the middle rack of the oven, and bake for 4 to 5 minutes or until golden brown.
Place ricotta in a small bowl.
Zest lemon; add to ricotta.
Juice lemon, removing any seeds, and add to ricotta.
Stir well.
Top each crostini with a hearty tablespoon of ricotta mixture.
Drizzle with honey.
Sprinkle with a flake or two of sea salt.

Photo: Bruschetta with lemon honey ricotta. Photo by Michele Pesula Kuegler.

Banana whoopie pies

Remember all that healthy eating I wrote about a couple weeks ago? Toss it out the window! I know, healthy eating is important, but so is an occasional dessert!

While chocolate may come to mind when you think of whoopie pies, these banana whoopie pies may just become your go-to version after you make a batch. Much like a typical whoopie pie, they are built around two tender, moist cakes filled with frosting. What makes these extra special are two things. One, they are filled with cream cheese frosting, which helps to balance the sweetness. Second, there is a small layer of walnuts or pecans that adds a nice bit of crunch.

This recipe is about as straightforward as a dessert recipe can be. There are no important ingredient or cooking notes. Just make a batch, and enjoy!

Banana whoopie pies
Makes 12

Cakes
½ cup unsalted butter, softened
½ cup light brown sugar
¼ cup granulated sugar
1 egg
1½ cups mashed banana, about 3
1 teaspoon vanilla
1 teaspoon cinnamon
1 teaspoon baking powder
1 teaspoon baking soda
¾ teaspoon salt
2 cups all-purpose flour

Filling
4 ounces cream cheese, softened
¼ cup unsalted butter, softened
1¾ cups powdered sugar
1 Tablespoon whole milk
1 teaspoon vanilla
½ cup maple glazed walnut or pecans, chopped (optional)

Preheat oven to 350 degrees.
Line a baking sheet with parchment paper.
Place butter and both sugars in the bowl of a stand mixer, and beat with paddle attachment on speed 2 until smooth.
Add egg, mixing until fully incorporated on speed 2.
Add banana, vanilla, cinnamon, baking powder, baking soda and salt, mixing well on speed 2.
Use a spatula to scrape down the sides, and mix again.
Add flour, mixing on low; scrape sides with spatula and mix until fully blended.
Scoop approximately 1½ tablespoons batter, spaced evenly, onto the prepared baking sheet.
Bake for about 15 to 20 minutes, or until cakes spring back when touched.
Allow to cool for 2 minutes on baking sheet.
Transfer to a baking rack to cool completely.
To assemble:
In a stand mixer cream together the cream cheese and butter on speed 2 for about 4 minutes.
Add powdered sugar, milk and vanilla; mix on low speed until combined.
Spread the flat side of 12 cakes with the cream cheese frosting.
If using the pecan or walnuts, sprinkle a tablespoon on top of the frosting.
Top each with another cake.

Photo: Banana whoopie pies. Photo by Michele Pesula Kuegler

Plum & prosciutto bites

We are now entering the doldrums of New England winter. There are an unknown number of cold and snowy days in our future. To remove some of the cold, I often like to warm my home with a pot of soup on the stove or a loaf of bread in the oven. Other times I like to make dishes that remind me of warmer days. These bites fall into the latter category.

Made with a plum slice base, these petite appetizers evoke memories of steamy summer days. As your mind travels to thoughts of warmer places, your palate will be enticed by the combination of flavors. Salty prosciutto tops silky cream cheese, both of which are placed upon a slightly tart and slightly sweet slice of plum. In fact all of the elements are so nicely balanced, you may consider eating more than your share!

In addition to being a few-ingredient, small-amount-of-time recipe, it is also low-maintenance. As opposed to many recipes, the thickness of the prosciutto is negotiable. If you have prosciutto that’s paper-thin, it will work. If your prosciutto is thicker than that, it will be fine also. For the cream cheese, whatever you have on hand is perfect. Light, whipped, tub, or bar — all are fine options. Finally, even the plums don’t have to be at the height of ripeness. That sprinkle of sugar and broiler time will help any plum that is underripe.

Let the “I’m pretending it isn’t winter” snacking begin!

Plum & prosciutto bites
Serves 4-6

2 ounces cream cheese, softened
4 slices prosciutto
4 plums
2 teaspoons granulated sugar

Heat a nonstick frying pan over medium heat.
Cut each prosciutto slice into four smaller rectangles.
Place prosciutto rectangles in the heated frying pan, cooking each side for 30 seconds or until crispy.
Transfer to a plate or cutting board.
Preheat broiler on high.
Cut the plums in half along the crease; remove and discard the pit.
Cut each half of the plum in half, so that you have four round disks.*
Sprinkle each slice with a pinch of sugar.
Transfer plum slices to a broiler pan.
Place broiler pan on a rack in the highest part of your oven, and cook until sugar melts. (This will take anywhere from 30 seconds to a couple minutes; keep a close eye.)
Remove plum slices from broiler.
Top each plum with a scant amount of cream cheese and a prosciutto rectangle, folded as needed.
Can be served immediately or refrigerated for an hour or two prior to serving.

*If needed, refer to the image attached to this recipe. You want disks, not wedges, of plum for this recipe.

Photo: Plum & prosciutto bites. Photo by Michele Pesula Kuegler

Stay in the loop!

Get FREE weekly briefs on local food, music,

arts, and more across southern New Hampshire!