Healthy pumpkin oatmeal

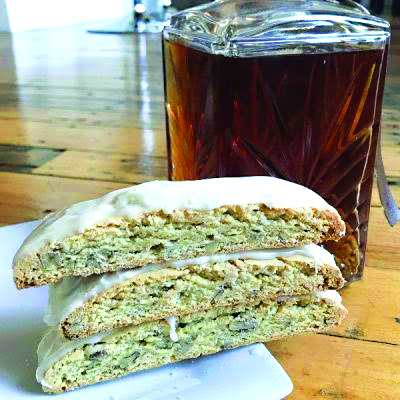
Happy Thanksgiving, everyone! More than likely this weekend is filled with food, whether you’re surrounded by family and friends or are keeping it more intimate. Among all that food, you might be seeking some respite. This oatmeal recipe is here to save the day, or at least get your morning off to a healthier start.

Not only is this recipe healthy, it is also incredibly easy to make. You combine all of the ingredients in the evening, refrigerate overnight, and then have a small amount of baking time in the morning. At that point you are rewarded with a piping hot breakfast with a heaping serving of pumpkin to start your day.

If you have company for the long weekend, this recipe can easily be doubled, tripled, quadrupled as needed. Plus, it is made with pureed pumpkin, and how much more fall-like could a dish be? Although it’s simple to make, it definitely gives the appearance of a much fancier breakfast dish.

Ingredient notes: Make sure you buy 100-percent pure pumpkin puree. You do not want pumpkin pie filling, which will be much sweeter. You also want to use old-fashioned or rolled oats. Instant oats will lose a lot of texture and become soggy. Finally, I recommend using almond milk, as it is my go-to milk. However, skim milk, soy milk, and coconut milk all could work and keep this a healthy dish.

Michele Pesula Kuegler has been thinking about food her entire life. Since 2007, the New Hampshire native has been sharing these food thoughts and recipes at her blog, Think Tasty. Visit thinktasty.com to find more of her recipes.

Healthy pumpkin oatmeal
Serves 2

1½ cups canned pumpkin (100% pure pumpkin)
½ cup old-fashioned oats
2 egg whites
2 teaspoons granulated sugar
½ teaspoon cinnamon
½ cup unsweetened almond milk*

Spray a small baking dish with nonstick cooking spray.
Combine pumpkin, oats, egg whites, sugar and cinnamon in the prepared dish, and stir well.
Cover with foil, and refrigerate for 8 to 12 hours.
Preheat oven to 350 degrees
Bake oatmeal mixture, covered with foil, for 20 minutes and uncovered for another 10 minutes.
To serve: Scoop half of the pumpkin mixture into a cereal bowl.
Top each serving with 1/4 cup almond milk.
Sprinkle with extra cinnamon and sugar, if desired.

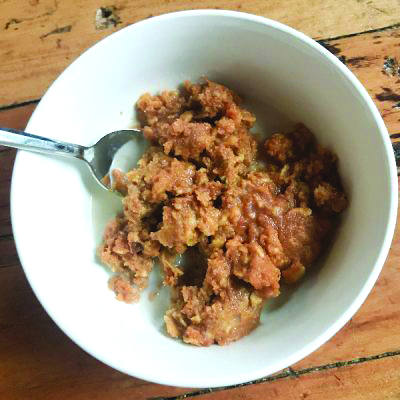
Photo: Healthy pumpkin oatmeal. Photo courtesy of Michele Pesula Kuegler.

Pecan biscotti with a bourbon kick

It’s a week before Thanksgiving, and you may be up to your eyeballs with menu planning, grocery shopping and kitchen scheduling. Thus, you may wonder why on Earth you need a biscotti recipe this week. The answer is easy: They’re delicious and versatile.

If you have time to bake these before Thanksgiving they can serve many roles: a part of the dessert table, a breakfast offering for houseguests, a gift for the host. If you don’t have time to bake them now, save the recipe to use either as (1) a treat for yourself or (2) a homemade holiday gift that ships and stores well.

There are a couple notes for this recipe. First, it obviously contains alcohol. Some of the bourbon is used in the glaze, which means the alcohol doesn’t bake off. This might be considered an adults-only treat. Second, you want to use a bourbon that you would drink straight up or on the rocks. As it’s used in the biscotti and the glaze, its flavor will be prominent.

Michele Pesula Kuegler has been thinking about food her entire life. Since 2007, the New Hampshire native has been sharing these food thoughts and recipes at her blog, Think Tasty. Visit thinktasty.com to find more of her recipes.

Pecan biscotti with a bourbon kick
Makes 30

1/3 cup unsalted butter, softened
1 1/4 cups granulated sugar
2 eggs
1 teaspoon vanilla extract
4 Tablespoons bourbon, divided
2 1/4 cups all-purpose flour
1 teaspoon baking powder
1/4 teaspoon salt
3/4 cup chopped pecans
1½ cups powdered sugar
1½ Tablespoons bourbon
Skim milk

Preheat oven to 350 degrees.
Beat butter and sugar in the bowl of a stand mixer on speed 2.
Add eggs one at a time, beating until fully combined.
Add vanilla and 3 tablespoons bourbon, mixing for 1 minute.
In a separate bowl combine flour, baking powder and salt.
Add flour mixture to wet ingredients and blend.
Stir pecans into dough.
Divide dough in half.
Shape each half into a 10″ x 3″ rectangle, using floured hands.
Set loaves 2 inches apart on a parchment paper-lined baking sheet.
Bake for 30 minutes or until the dough is set.
Leaving the oven on, remove the biscotti loaves and cool for 15 minutes on the baking sheet.
Then, using a chef’s knife, cut the loaves into diagonal slices, 1/2 inch thick.
Place the slices on the baking sheet with the cut sides down; brush with 1 tablespoon bourbon.
Bake for 8 to 9 minutes.
Turn slices over and bake for 8 to 9 minutes more.
Remove biscotti from the oven and allow to cool completely on a cooling rack.
Combine powdered sugar and 1 1/2 tablespoons bourbon; stir well.
Add milk 1 teaspoon at a time until desired consistency is reached.
Using a spoon, coat the top side of each biscotti with glaze.
Allow glaze to harden; then eat or store in a sealed container.

Photo: Pecan biscotti with a bourbon kick. Photo courtesy of Michele Pesula Kuegler.

Deconstructed poached pear

I really enjoy poached pears. They are a versatile menu item. Want a less sweet dessert? The poached pear plays that role well. Want a fruit-centric appetizer? The poached pear can be that also. However, poached pears can be a little challenging to eat when served whole or even halved. Their rounded edges want to defy the fork and knife you’re wielding!

That is where this recipe for a deconstructed poached pear comes in handy. Thin slices of pear cooked until tender are eaten easily, no knife required. Plus, sliced pears poach more quickly and evenly than a whole or half pear.

The trickiest part of this recipe may be forming the quenelle of goat cheese. Don’t fret about that. A quenelle is simply an egg-shaped portion of food. Using two spoons you should be able to do that. If not, you can use a small spatula to help shape the goat cheese into a similar shape.

A few ingredient notes for this recipe: You can replace Bosc pears with Bartlett or Anjou. I would not suggest using a smaller pear, such as Seckel. For the wine, you want to add another flavor element to the dish without overpowering the other ingredients, which is why I suggest unoaked chardonnay. Another choice would be a pinot gris or pinot grigio.

Get your ingredients assembled; it’s time to make a new and delicious appetizer or dessert.

Michele Pesula Kuegler has been thinking about food her entire life. Since 2007, the New Hampshire native has been sharing these food thoughts and recipes at her blog, Think Tasty. Visit thinktasty.com to find more of her recipes.

Deconstructed poached pear
Serves 4

2 Tablespoons sliced almonds
1 Tablespoon maple syrup
1 Bosc pear
1 cup dry white wine, such as an unoaked chardonnay
2 ounces goat cheese, room temperature
1 Tablespoon milk

Combine almonds and maple syrup in a microwave-safe bowl.
Microwave on high in 30-second increments, stirring after each.
When syrup clings to almonds and no liquid rests in the bottom of the bowl, remove from the microwave.
Carefully transfer almonds to a cutting board or piece of waxed paper, using a spoon.
Spread out the almonds to cool.
Cut pear in half, and carefully remove stem and core.
Cut each half into 10-12 thin slices.
Pour wine into a small saucepan, and place on high heat.
When wine begins to boil, reduce to a simmer and add pear slices.
Allow slices to simmer for 4 to 5 minutes or until just fork tender.
While pear slices simmer, combine goat cheese and milk in a small bowl, stirring until fully combined.
To assemble: Place 5 or 6 pear slices on a small plate.
Form a quenelle of goat cheese, using two spoons, and place next to pears.
Sprinkle maple-coated almonds over pear slices.

Photo: Deconstructed poached pear. Photo courtesy of Michele Pesula Kuegler.

Mini pumpkin whoopie pies

The season of eating has begun! Or at least in my eyes it has. Halloween kicks off a series of holidays and parties that are food-centric. Why not add a fall-themed recipe to the list of treats you can make to share at these gatherings?

These whoopie pies are really quite simple to make — not much more effort is required than in making a batch of cookies. However, a tray of these mini whoopie pies garners much more attention than a plate of cookies. Trust me.

When making these whoopie pies there are a couple items of note. First, make sure you buy canned pumpkin puree. You don’t want pie filling, which will be too sweet, and you don’t want to use fresh pumpkin. Fresh pumpkin sounds nice, but it takes a lot more time to cook it, and it probably won’t be as smooth as the canned version. Second, when baking the cakes, if you don’t trust your judgment when testing their springiness, you also can use a cake tester or toothpick. If it comes out clean, the cakes are done. Don’t overbake the cakes; you want them to be moist.

Michele Pesula Kuegler has been thinking about food her entire life. Since 2007, the New Hampshire native has been sharing these food thoughts and recipes at her blog, Think Tasty. Visit thinktasty.com to find more of her recipes.

Mini pumpkin whoopie pies
Makes 15

Cakes
½ cup unsalted butter, melted & cooled
1 cup light brown sugar
1 egg
1½ cups canned pumpkin puree
1 teaspoon vanilla
2 teaspoons cinnamon
½ teaspoon ground cloves
1 teaspoon baking powder
1 teaspoon baking soda
¾ teaspoon salt
1⅔ cups all-purpose flour

Filling
4 ounces cream cheese, softened
¼ cup unsalted butter, softened
1¾ cups powdered sugar
1 Tablespoon whole milk
1 teaspoon vanilla

Cakes
Preheat oven to 350 degrees.
Line a baking sheet with parchment paper.
Place ½ cup butter and brown sugar in the bowl of a stand mixer, and beat with paddle attachment on speed 2 until smooth.
Add egg, mixing until fully incorporated on speed 2.
Add pumpkin, vanilla, cinnamon, ground cloves, baking powder, baking soda and salt, mixing well on speed 2.
Use a spatula to scrape down the sides, and mix again.
Add flour, mixing on low; scrape sides with spatula and mix until fully blended.
Scoop approximately 1½ tablespoons batter, spaced evenly, onto baking sheet.
Bake for 18 minutes or until cakes spring back when touched.
Allow to cool for 2 minutes on baking sheet.
Transfer to baking rack to cool completely.

To assemble
In a stand mixer cream together the cream cheese and 1/4 cup butter on speed 2 for about 4 minutes.
Add powdered sugar, milk, and vanilla; mix on low speed until combined.
Spread the flat side of 15 cooled cakes with the cream cheese frosting.
Top each with another cake.

Photo: Photo by Michele Pesula Kuegler.

Creamy carrot soup

Not only does this time of year mark the start of baking season; it also marks the start of soup season. While there are times that I want a soup that is quick to make, there are other days where I want a soup that simmers all afternoon. Nothing helps a day feel less chilly than something simmering on the stove, right?

This soup was created for the simmer-all-afternoon category. However, if you want to serve it on a weeknight, you can break the recipe into two parts. Do the slow simmering phase on a weekend day when you have some free time. Then, on the night it is to be served, simply take that broth you created and finish the recipe in under an hour. The most important thing is not to skip the slow simmering phase and replace it with store-bought stock. The stock that you are creating for this recipe is so flavorful that it is worth the effort.

Once you have your cooking plan ready, you can consider how you will serve the soup. I created this recipe with the thought that it makes a fine side-dish soup. Pair it with a sandwich (grilled cheese, chicken salad, or whatever you prefer) for something more filling, or a salad if you are eating lighter. However, it could become a main dish soup with the addition of some protein. Add some diced, cooked chicken breast or crumbled chorizo, and you have a fairly hearty soup.

No matter how you make or serve this soup, it is bound to be a new fall favorite.

Michele Pesula Kuegler has been thinking about food her entire life. Since 2007, the New Hampshire native has been sharing these food thoughts and recipes at her blog, Think Tasty. Visit thinktasty.com to find more of her recipes.

New & improved creamy carrot soup
Serves 4

6 cups water
1 sweet onion, quartered
4 celery stalks, quartered
6 garlic cloves
4 large carrots, ends trimmed & quartered
2 teaspoons dried rosemary
2 teaspoons kosher salt
Ground black pepper
7 large carrots, peeled & cubed
½ cup whole milk

Combine water, onion, celery, garlic, 4 carrots, rosemary, salt and pepper in a large pot.
Bring to a boil; reduce heat to low.
Cover and simmer for 2 hours.
Strain broth with a fine mesh sieve, and return broth to pot.
Add 7 peeled and cubed carrots to broth, bring to a boil.
Reduce heat and cook for 10-12 minutes or until carrots are tender.
Allow broth to cool for 30 minutes.
Puree broth and carrots in small batches, or use immersion blender to puree.
Return puree to pot.
Simmer on low for 10 minutes.
Stir in milk.
Season to taste with additional salt and pepper, if desired.

Photo: New, improved creamy carrot soup. Photo by Michele Pesula Kuegler.

Savory Parmesan biscotti

Homemade biscotti have been in my baking repertoire for ages. However, the majority of my biscotti baking has been focused on sweet baked goods. More recently I have come to discover the delightfulness of savory biscotti.

This is the perfect time of year for an introduction to these savory biscotti. With cooler weather arriving, fall is practically begging you to turn your oven on and create some baked goods. Plus, this season usually heralds the returns of soups and stews, which are even more enjoyable when served with a carb-centric side. But forget cornbread and biscuits next time and try biscotti instead.

There are so many reasons to pair these biscotti with your soup or stew. As they are twice-baked and crunchy, they have the perfect consistency for dipping in the broth. Plus, biscotti keep really well, so you can make them when you have a little bit of time and store them until you need them.

Ingredient note: If you don’t have Parmesan on hand, any other hard cheese could be used as a substitute, such as romano or asiago.

Michele Pesula Kuegler has been thinking about food her entire life. Since 2007, the New Hampshire native has been sharing these food thoughts and recipes at her blog, Think Tasty. Visit thinktasty.com to find more of her recipes.

Savory Parmesan biscotti
Makes 24

1/3 cup salted butter, softened
3 Tablespoons sugar
2 eggs
2 cups all-purpose flour
2 teaspoons baking powder
1/2 teaspoon salt
3/4 cup shredded Parmesan
1 teaspoon dried oregano
1 teaspoon dried basil
1/4 cup shredded Parmesan (for sprinkling)

Preheat oven to 350 degrees.
Beat butter and sugar in the bowl of a stand mixer on speed 2 for 2 minutes.
Add eggs, one at a time, beating until each is incorporated.
In a separate bowl, stir flour, baking powder, salt, 3/4 cup Parmesan, oregano and basil together.
Add flour mixture to wet ingredients and mix on speed 2 for 1 minute..
Divide dough in half.
Shape each half into a 10″ x 3″ rectangle, using floured hands.
Set loaves 2″ apart on a parchment paper-lined baking sheet.
Bake for 30 minutes or until the dough is set.
Leaving the oven on, remove the biscotti loaves and cool for 15 minutes on baking sheet.
Using a butcher’s knife, cut the loaves into diagonal slices, 3/4″ thick.
Place slices on cookie sheet with the cut sides down.
Bake for 8 to 9 minutes.
Turn over slices, and sprinkle with remaining 1/4 cup shredded Parmesan.
Bake for an additional 8 to 9 minutes.
Remove biscotti from oven, and transfer to a baking rack to cool completely.

Photo: Savory Parmesan biscotti. Courtesy photo.

Stay in the loop!

Get FREE weekly briefs on local food, music,

arts, and more across southern New Hampshire!