Caramel apple scones

September is here, which means two things in New Hampshire. First, it’s back to school time. Second, it’s apple season. With so many apple orchards within a short drive, it’s a common weekend outing to pick (or at least buy) locally grown apples.

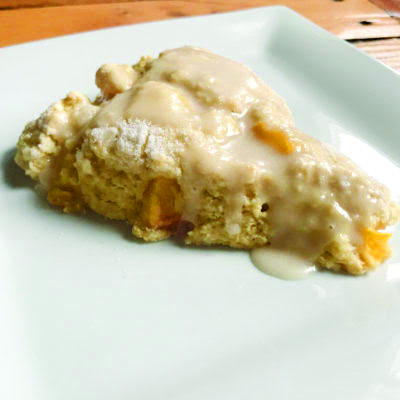
When you get home with all those apples, you may default to a classic treat, such as apple pie or apple crisp. Why not add another sweet treat to your repertoire, especially when it’s one that can be served as breakfast?! These caramel apple scones are a deliciously indulgent way to start your day. Tender scones filled with chunks of apple and caramel chips are the baked goods you didn’t know you needed.

I have two hints for making these scones. First, use an apple that is tart. The caramel chips add a good amount of sweetness, and a tart apple balances that out. Second, you don’t have to buy buttermilk to make these. You can make your own, using the directions at the bottom of the recipe.

Go get some apples, and then let the baking begin!

Michele Pesula Kuegler has been thinking about food her entire life. Since 2007, the New Hampshire native has been sharing these food thoughts and recipes at her blog, Think Tasty. Visit thinktasty.com to find more of her recipes.

Caramel apple scones
Makes 8

2 cups all-purpose flour
1/4 cup granulated sugar
3 Tablespoons light brown sugar
1 teaspoon baking powder
1/2 teaspoon baking soda
1/2 teaspoon salt
5 Tablespoons chilled unsalted butter, diced
3/4 cup caramel chips
3/4 cup peeled, diced apple
3/4 cup buttermilk*
1 large egg yolk
1 teaspoon vanilla
2 Tablespoons sugar

Preheat oven to 375 degrees.
Mix flour, 1/4 cup sugar, brown sugar, baking powder, baking soda and salt in a large bowl.
Add butter.
Combine dry ingredients using a pastry blender, two forks, or fingers until butter is reduced to the size of peas.
Add caramel chips and diced apple to the flour mixture, tossing gently.
Whisk buttermilk, egg yolk and vanilla in a 2-cup liquid measuring cup or small bowl.
Add liquids to dry ingredients; mix until dough forms a ball.
Place dough on a lightly floured surface and press into an 8-inch round.
Cut into 8 wedges. Sprinkle with 2 tablespoons sugar.
Transfer wedges to rimmed cookie sheet, preferably lined with parchment paper.
Bake for 15 to 25 minutes or until the scones are crusty on top and a tester inserted into the center comes out clean.
Serve warm.

Notes
Instead of using buttermilk, I often combine 1 tablespoon lemon juice and enough milk to equal 3/4 cup. (This can be done with either dairy or non-dairy milk.)

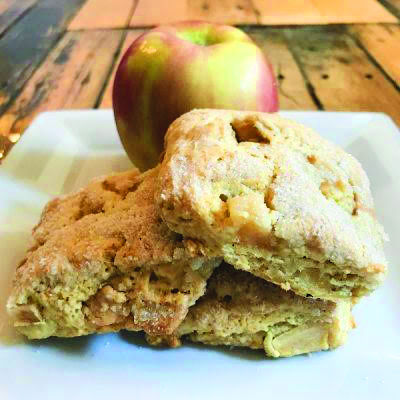
Photo: Caramel apple scones. Courtesy photo.

Snickerdoodle muffins

Isn’t it every child’s dream to be able to eat cookies for breakfast? Actually, don’t a lot of adults have that dream? While I can’t fully endorse cookies for breakfast, I absolutely can support making and eating muffins that taste just like a cookie!

Snickerdoodles have been a regularly made cookie in my home, both as a child and a mom. The combination of sugar and cinnamon plus an interesting hint of tartness makes them a “hard to eat just one” cookie. Turn them into a muffin, and they’re a delicious way to start the day.

Most of the ingredients in these muffins are pretty straightforward and probably are items that can be found in your refrigerator and pantry. The one ingredient you may not have but absolutely need is cream of tartar. You’ll find it in the spice section in the grocery store. Although you need only a small amount, it gives these muffins that special something. As for the milk in the recipe, use whatever you have: plant-based, whole milk, skim. It really doesn’t matter.

Now, for serving them, I highly recommend eating them warm, sliced in half and topped with a little bit of butter. They are so delicious they might be called “hard to eat just one” muffins.

Michele Pesula Kuegler has been thinking about food her entire life. Since 2007, the New Hampshire native has been sharing these food thoughts and recipes at her blog, Think Tasty. Visit thinktasty.com to find more of her recipes.

Snickerdoodle muffins
Makes 12

Muffins
1 1/2 cups all-purpose flour
2 teaspoons baking powder
3/4 teaspoon cream of tartar
1/4 teaspoon salt
1/2 cup granulated sugar
1/2 cup milk
1 teaspoon vanilla extract
1 large egg
1/3 cup unsalted butter, melted

Muffin topping
1/2 cup sugar
2 teaspoons cinnamon
2 Tablespoons unsalted butter, melted

Muffins
Preheat oven to 350 degrees.
Spray a muffin pan with nonstick spray.
In a large bowl, whisk together the flour, baking powder, cream of tartar, salt and sugar.
In a large measuring cup whisk the milk, vanilla and egg together.
Add the milk mixture and 1/3 cup melted butter to the flour mixture.
Stir just until flour mixture is fully moistened. It may be lumpy.
Fill each muffin cup 3/4 full.
Bake for 14 to 16 minutes.
Cool muffins in the pan for 5 minutes.

Topping
In a small bowl, combine the sugar and cinnamon.
Remove the muffins from the pan.
Brush the tops of the muffins with the melted butter.
Generously sprinkle the tops with the cinnamon-sugar mixture.

Photo: Snickerdoodle muffins. Courtesy photo.

Lots of lemon whoopie pies

Although so much of my summer cooking and baking revolves around local produce, this lemon recipe is a summertime favorite of mine. There is something about the bright flavor of lemons that makes me think of hot summer afternoons.

These whoopie pies are all about lemon flavor. Both the cake and the filling are lemon-centric with the addition of lemon extract, lemon zest and lemon juice. What is key to this recipe is to use freshly squeezed lemon juice. Although I keep a bottle of lemon juice in my refrigerator, you really need freshly squeezed for this recipe. It makes the flavor so much brighter.

If you’re hungry, make these full-sized whoopie pies. If you have a smaller appetite, make the scoop about half as big, and you’ll have 20 delightful mini whoopie pies to enjoy.

Michele Pesula Kuegler has been thinking about food her entire life. Since 2007, the New Hampshire native has been sharing these food thoughts and recipes at her blog, Think Tasty. Visit thinktasty.com to find more of her recipes.

Lots of lemon whoopie pies
Makes 10

For the cakes:
1/2 cup butter, softened
1 cup granulated sugar
2 eggs
1 teaspoon lemon extract
1/2 teaspoon vanilla extract
1 teaspoon baking powder
1 teaspoon baking soda
1/2 teaspoon salt
2 cups all-purpose flour
Zest of 1 lemon
1/4 cup freshly squeezed lemon juice
3 Tablespoons milk
Yellow food coloring, if desired

For the filling:
1/2 cup butter, softened
2 1/4 cups powdered sugar
2 Tablespoons freshly squeezed lemon juice
1 teaspoon lemon extract

To make the cakes:
Preheat oven to 350 degrees.
Line 2 baking sheets with parchment paper.
Place butter and sugar in stand mixer, and beat with paddle attachment on speed 2 for 2 minutes.
Add eggs, one at a time, mixing until each is fully incorporated on speed 2.
Add extracts, baking powder, baking soda and salt, mixing well on speed 2.
Use a spatula to scrape down the sides, and add lemon zest and 1 cup of flour.
Mix on low; scrape sides with spatula, add lemon juice, and mix until fully blended.
Add remaining cup of flour, mix.
Add milk and food coloring, and mix until fully combined.
Scoop approximately 1 1/2 Tablespoons batter, spaced evenly, onto baking sheets.
Bake for about 15 to 20 minutes, or until cakes spring back when touched.
Allow to cool for 2 minutes on the baking sheets.
Transfer to a baking rack to cool completely.

To make the filling:
In a stand mixer combine butter, powdered sugar, lemon juice, and lemon extract; mix on low speed until combined.
Spread the flat side of 10 cakes with the frosting.
Top each with another cake.
Serve or store in a sealed container.

Photo: Lemon whoopie pies. Courtesy photo.

Fresh peach slump

Last week I wrote about fresh peach scones, which are a delicious way to start your day. Now I have a recipe for fresh peach slump — a delectable way to end your day. At the height of peach season, there’s really no better way to start and end the day than with peach-centric dishes.


Slumps are newer to my cooking repertoire. Typically when I am making a fruit-based dessert, I lean toward crisps. I enjoy the combination of brown sugar and oats that top them. However, I was asked by a friend if I could create a slump, and from that, this recipe was created. Just as with a crisp, the focus is on the gently cooked fruit. However, instead of oats and brown sugar, there’s a tender, sweet biscuit coating.


Served with some freshly made (or straight from the can) whipped cream, it’s the perfect ending to a summer meal.

Michele Pesula Kuegler has been thinking about food her entire life. Since 2007, the New Hampshire native has been sharing these food thoughts and recipes at her blog, Think Tasty. Visit thinktasty.com to find more of her recipes.

Fresh peach slump
Serves 8

For the filling:
4 cups peaches, pitted and diced
½ cup granulated sugar
2½ Tablespoons cornstarch
½ teaspoon salt

For the dumplings:
1½ cups all-purpose flour
2 Tablespoons sugar
1 teaspoon baking powder
½ teaspoon baking soda
½ teaspoon salt
¼ cup cold butter, diced
½ cup milk
½ teaspoon vanilla
⅓ cup water

Place the peaches in a large skillet or Dutch oven.
In a small bowl combine the sugar, cornstarch and salt; sprinkle over the peaches.
Place the Dutch oven (or skillet) on a burner over a medium heat until the peaches begin simmering.
Stir occasionally and gently, simmering for 10 minutes; remove from heat.
Whisk the flour, sugar, baking soda, baking powder and salt together in a large bowl.
Add the butter and combine using a pastry blender, two forks or your fingers until butter is reduced to the size of peas.
Add the milk and vanilla, and stir until just combined.
Divide the dough into eight pieces and place evenly over the peach mixture.
Add 1/3 cup water, pouring between dumplings.
Return the pot to the stove and bring to a low simmer.
Cover fully with a lid and simmer for about 20 minutes, or until dumplings are puffy and cooked through.
Uncover and let sit for 15 minutes before serving.
If desired, sprinkle the top of each dumpling with cinnamon and sugar or serve with a dollop of whipped cream.

Photo: Peach slump. Courtesy photo.

Fresh peach scones

The second half of summer heralds a rush of locally grown produce. For a cook, it’s an exciting time of year. With so many freshly picked fruits and veggies available, it can be difficult to decide what to cook or bake next.

For the next two weeks peaches are the focus in my kitchen. Although this fruit is absolutely perfect when eaten on its own, it’s also fun to find new ways to serve it, such as these scones. For this recipe you want peaches that are perfectly ripe —‌ nicely sweet but not too soft. The softer the peaches are, the more liquid that adds to your scone. If it happens that your peaches are a bit on the softer side, you can add a little more flour to make the dough less sticky.
These scones are topped with a simple vanilla glaze. If you would rather not add the glaze, I would suggest sprinkling a tablespoon or two of granulated sugar on the scones right before baking. Either way you’ll have a nicely sweet scone full of freshly picked peaches.

Michele Pesula Kuegler has been thinking about food her entire life. Since 2007, the New Hampshire native has been sharing these food thoughts and recipes at her blog, Think Tasty. Visit thinktasty.com to find more of her recipes.

Fresh peach scones
Makes 8

2 cups all-purpose flour
1/3 cup granulated sugar
1 teaspoon baking powder
1/2 teaspoon baking soda
1/2 teaspoon salt
5 Tablespoons chilled unsalted butter, diced
1 cup diced peach*
3/4 cup buttermilk**
1 large egg yolk
2 teaspoons vanilla divided
1 cup powdered sugar
1 Tablespoon milk

Preheat oven to 400 degrees.
Mix flour, granulated sugar, baking powder, baking soda and salt in a large bowl.
Add butter.
Combine butter with dry ingredients using a pastry blender, two forks, or your fingers until the butter is reduced to the size of grains of rice.
Add diced peach to flour mixture, tossing gently.
Whisk buttermilk, egg yolk, and 1 teaspoon vanilla in a 2-cup liquid measuring cup or small bowl.
Add liquids to dry ingredients; mix until dough forms a ball.
Place dough on a lightly floured surface and press into an 8-inch round.
Cut into 8 wedges.
Transfer wedges to a parchment paper-lined, rimmed cookie sheet.
Bake for 15-20 minutes or until the scones are crusty on top and a tester inserted into the center comes out clean.
While cooling, combine powdered sugar, 1 teaspoon vanilla, and 1 tablespoon milk.
Top each scone with vanilla glaze.
Notes
*I prefer to keep the skin on the peaches in this recipe. You can peel them if you prefer.
**In place of buttermilk, you can pour 1 tablespoon lemon juice into a measuring cup and fill with milk to equal 3/4 cup. Allow to sit for 2 minutes before adding it to the recipe.

Photo: Peach scones. Courtesy photo.

Very berry smoothie bowl

Whether you have an abundance of locally picked blueberries that are stored in your freezer or you bought a bag at the grocery store, I have a terrifically healthy recipe for them. This berry smoothie bowl is my go-to breakfast at least five days a week. However, it also could be a nice, light lunch on a hot summer day or a healthier version of soft-serve ice cream.

One key part of this recipe isn’t an ingredient but the equipment. I don’t often mandate specific equipment, but for this recipe a food processor is essential. Because you want the final product to be fairly thick and viscous enough to be eaten with a spoon, you’re going to want to use a food processor. A blender will work, kind of, but in order to get this well-blended, you’re going to need to make it thinner. You possibly could use an immersion blender, but I’ve never tried, so I can’t verify that.

As far as the ingredients go, there are a few things to consider. For the banana slices, I’d recommend making them about 1/2 inch thick. Too much smaller and they’ll become soft too fast; too much bigger and they’re tougher to process. For the broccoli, trust me. It’ll add more nutrients, and you won’t even taste it. For the peanut butter powder, you probably could substitute actual peanut butter with little issue. Finally, any plant- or dairy-based milk will work fine. Unsweetened almond milk just happens to be my favorite option.

Now, with a few caveats, you are ready to make the tastiest, healthiest chilled breakfast or lunch you’ve had in a while.

Michele Pesula Kuegler has been thinking about food her entire life. Since 2007, the New Hampshire native has been sharing these food thoughts and recipes at her blog, Think Tasty. Visit thinktasty.com to find more of her recipes.

Very berry smoothie bowl
Makes 1

1/2 cup sliced banana, frozen
1 cup frozen berries (blueberries, raspberries and sliced strawberries work)
1/4 cup frozen broccoli
1/2 to 3/4 cup unsweetened almond milk
1 Tablespoon peanut butter powder
Cereal or granola, if desired
Required equipment: food processor

Remove frozen banana from freezer, and set on the counter for 15 minutes to soften slightly or place in microwave for 5 seconds.
Place slightly defrosted banana and berries in food processor.
Place frozen broccoli in microwave-safe bowl* and defrost in microwave for 20 to 30 seconds.
Add broccoli to food processor.
Close food processor lid, leaving feed tube open.
Blend on high, adding 1/3 cup milk shortly thereafter.
After 10 seconds, stop processing. Remove lid, scrape down sides, and add peanut butter powder.
Blend on high, adding more milk to get the desired consistency.
Transfer to serving bowl.
Sprinkle with granola or other cereal to add texture, if desired.
Note
*Use the bowl you’ll be eating this smoothie in to save yourself from extra cleanup!

Photo: Very berry smoothie bowl. Courtesy photo.

Stay in the loop!

Get FREE weekly briefs on local food, music,

arts, and more across southern New Hampshire!