Hello, August! Today I have a slightly messy, lightly chilled treat for you. In full disclosure, the messiness is part of the making and possibly part of the eating, but they are oh so worth it.
These peanut butter truffles are a delicious combination of creamy and crunchy, as well as sweet and salty. They are also the easiest truffles to make but sound and taste like they are much more complicated.
When making these truffles, there are a few key notes. The cream cheese should be the whole-fat version. You want the truffles to be creamy, and regular cream cheese is just what this recipe needs. Also, I prefer milk chocolate for my truffles, but you could use semi-sweet chocolate for the coating, if you like. For the preparation, forming the peanut butter mixture into spheres can be a little messy. The cream cheese actually helps the peanut butter be less sticky, but you could coat your hands with some nonstick cooking spray to help. Finally, when dipping the peanut butter balls into the chocolate, you want to move quickly to prevent melting. However, be sure to take the time to remove excess chocolate, so you (1) have enough chocolate for the entire batch and (2) don’t have ill-formed truffles.
When eating these truffles, the coating will soften with heat. So, if it is a hot August day, I highly recommend eating them indoors with a napkin nearby. I am pretty sure you are going to find them to be worthy of the sticky fingers!
Peanut butter truffles
Makes 20
1½ ounces cream cheese, softened
⅓ cup creamy peanut butter
½ cup powdered sugar
2 Tablespoons chopped salted peanuts
1 4-ounce milk chocolate baking bar
Combine peanut butter and cream cheese in a medium bowl, beating until fully combined.
Add sugar and stir to combine.
Add peanuts, stirring until well blended.
Shape batter into 1-inch balls; place on a waxed paper-lined plate.
Freeze for 15 minutes.
Place chocolate in a small bowl and microwave in 15-second increments, stirring after each, until fully melted.
Line another plate with waxed paper.
Place one peanut butter ball in melted chocolate.
Using a fork, flip to coat all sides.
Scrape tines against the edge of the bowl to remove excess chocolate, and transfer the truffle to the new plate.
When all truffles are coated, refrigerate for 10 minutes to allow chocolate to harden.
Refrigerate in a covered container until ready to serve.
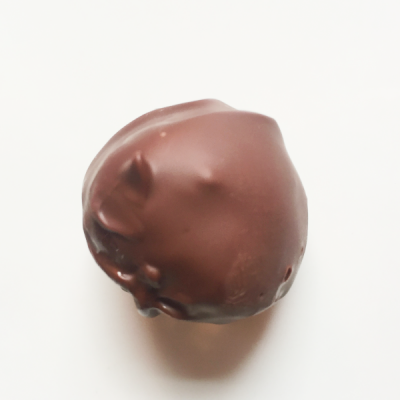
Featured Photo: Peanut butter truffle. Photo by Michele Pesula Kuegler.