Read the packets, don’t buy hybrid
As a boy in the 1950s I knew there were two kinds of tomatoes: deep red, plump and tasty ones my grandfather grew, and the kind that came four in a package wrapped in cellophane. The Cello-Wraps, as I think of them, had no flavor whatsoever. They were decorative. Sliced and added to our iceberg lettuce salads in winter, they added color.
My grandfather saved seeds from his tomatoes and started plants indoors in the early spring. He was not growing hybrid tomatoes like those sold in the supermarket. Hybrid tomatoes are carefully bred by crossing specific varieties of tomatoes so that they will have special characteristics such as surviving long trips in trucks, having a shelf life almost as long as a tennis ball, or resisting certain diseases.
My grandfather grew what we now call heirloom tomatoes: time-tested varieties that breed true from seed, generation after generation. Tomatoes that had been grown for many decades, seed shared with family and friends. Tomatoes so tasty that they were often eaten right in the garden, warm from the sun.
Examples of well-known heirloom tomatoes include Brandywine (often touted as the best-flavored tomato in existence), Cherokee Purple, Mortgage Lifter, Amish Paste and Black Krim. But there are hundreds of varieties of heirloom tomatoes, each unique and loved by someone.
All heirloom vegetables are what are called “open pollinated,” meaning that they will produce the same variety every year. Of course, in a packet of seeds some will produce better fruits than others. There is variety, but all Brandywines will take about the same length of time to reach maturity and taste about the same.
If you would like to start saving seeds, read the seed packet or catalog and make sure what you buy is labeled open-pollinated or heirloom, not hybrid. At the end of the season, save some seeds and store them in a cool, dry, dark place, perhaps in a sealed jar in a refrigerator.
I called Sylvia Davatz, the now-retired founder of Solstice Seeds in Hartland, Vermont, to talk about saving seeds. Solstice Seeds only grows and sells seeds from heirloom varieties, including some varieties from Europe.
She gave me lots of good advice, starting with the names of two good books on seed saving: The Seed Garden by Lee Buttala and Shanyn Seigel, and The Manual of Seed Saving by Andrea Heistinger. She recommends getting both books if you are going to be serious about saving seeds, as even among experts there are differences of opinion.
One of the reasons for having good books about seed saving is that they will advise you about such things as isolation distances to prevent mixing genetic material by pollinators or wind.
I asked Sylvia what vegetable species are the easiest to save. She said tomatoes, lettuce, beans and peas are all easy. They are self-pollinated and annuals. No insects are needed, and seeds are ready by the end of their season.
Vine crops like squash, pumpkins and cucumbers are insect pollinated and more difficult. If you’ve ever let a “pumpkin” grow in your compost pile from last year’s crop, you know that sometimes you get weird things due to cross-pollination — a pumpkin crossed with a summer squash by a bee, for example, may not be something you want to eat.
Most difficult in our climate are the biennials, things like carrots, beets, parsnips and parsley. These plants have to be kept alive all winter so they can flower and set seeds in their second year. You can dig up carrots and store them in soil in a bucket in a cold basement and replant them in the spring. But carrots, Sylvia explained to me, bloom about the same time as Queen Anne’s lace, a biennial wild flower/weed that can be pollinated by them — which would not produce the carrots you want.
Sylvia pointed out that in the not too distant past seed saving was the norm. Farmers and gardeners saved seeds from their best plants, knew how to do so, and knew how to store them. She explained that the seeds you save will usually be of better quality than seeds from a packet. They will have more vigor and a longer life span.
A good source for heirloom seeds is The Seed Savers Exchange. It has, since 1975, collected and stored seeds from gardeners and farmers. You can join their nonprofit or just buy some seeds or books from them. According to their website, they now store some 20,000 varieties in their collection, although at any given time only a fraction of them are actually for sale.
So think about saving seeds this year, even if only a few from your favorite heirloom tomatoes. And go to solsticeseeds.org to see a wonderful eight-minute video of Sylvia Davatz explaining all the importance and benefits of seed saving.
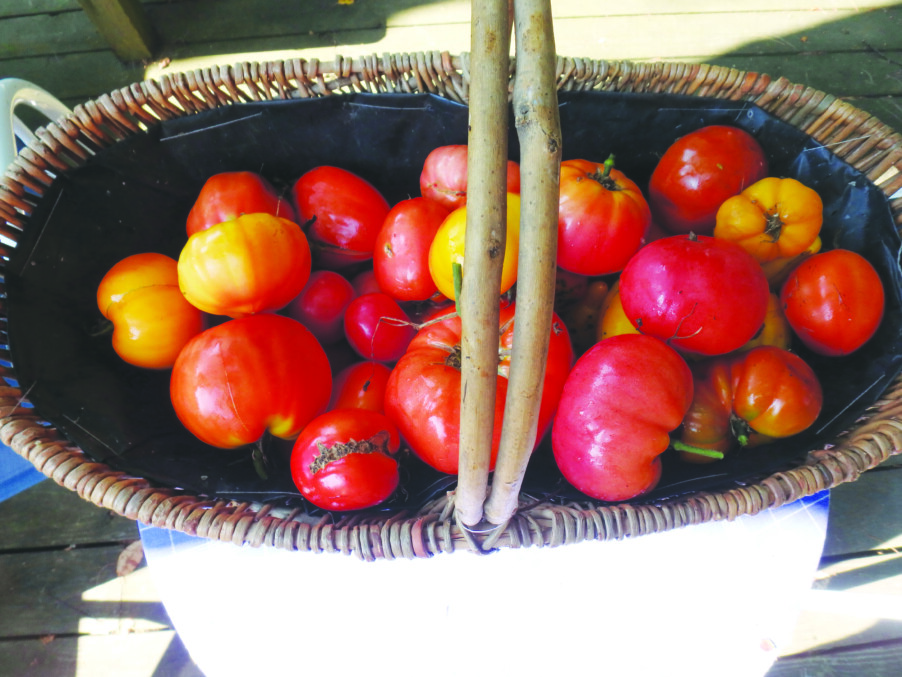
Featured photo: Heirloom tomatoes are often irregular in size and shape, but they are tasty and you can save seeds for next year. Photo by Henry Homeyer.