I think that it’s fair to say that Florida doesn’t have the best reputation.
Take, for example, the “Florida Man” game. If you’ve never tried this, your eyebrows are about to rise higher than you ever suspected was possible. Open an internet search engine, and enter the term “Florida man” and a date — your birthday is a good choice.
Feb. 9, for instance, when, according to the Florida Times-Union, a Florida man “was arrested … and charged with assault with a deadly weapon without intent to kill after Florida Fish and Wildlife Conservation officials say he threw a 3.5-foot alligator through a Palm Beach County Wendy’s drive-thru window.”
But it wasn’t always like this. There was a time in the 1940s and ’50s when Florida was seen as a chic and even elegant place. Miami Beach was where the most beautiful and wealthy people went to be seen, to dance in the moonlight and to drink cocktails. Powerful, cigar-chomping men in good suits flashed their brightest smiles — and wads of cash — in an effort to catch the attention of beautiful women in floral dresses. White-jacketed waiters delivered drinks to wide-eyed tourists. Dance bands played, and everywhere there were flowers.
I feel like we need more of that — more white suits and fancy drinks, and fewer fast-food alligator attacks.
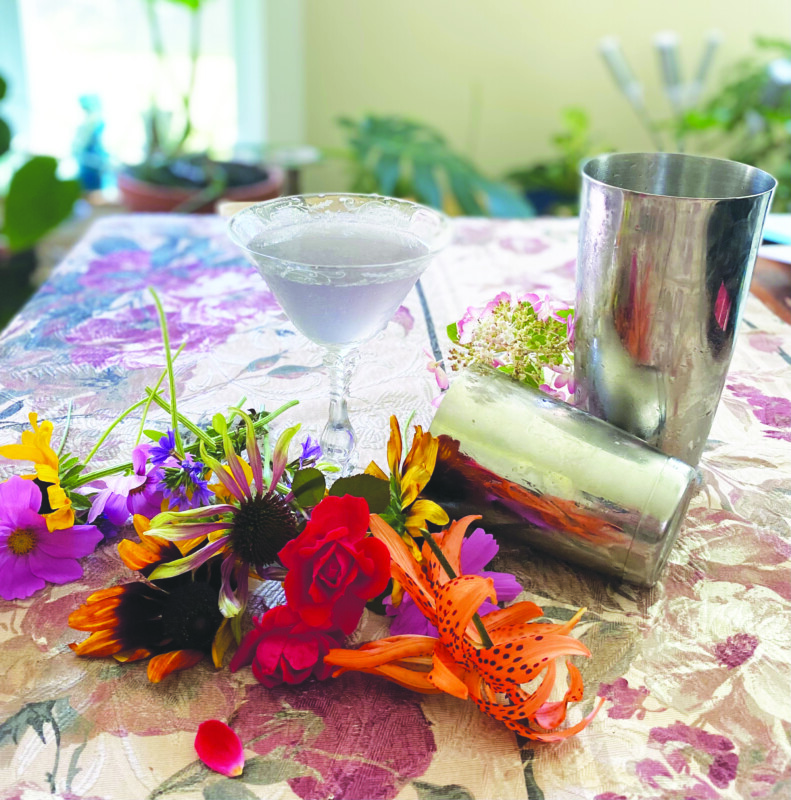
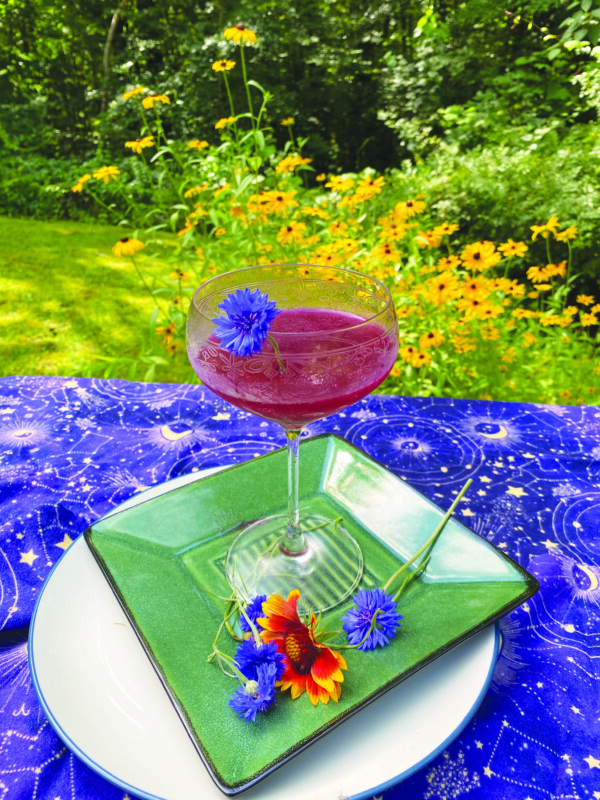
Miami Dancehall
2 ounces dry gin – I like Wiggly Bridge
½ ounce elderflower liqueur
½ ounce crème de violette – a violet-flavored liqueur
5 or 6 drops rose water – There is a razor’s edge between being floral and delicious, and tasting like your grandmother’s fancy soap. Err on the side of caution until you find the level of rosiness you like.
½ ounce fresh squeezed lemon juice
¼ ounce simple syrup
Combine all ingredients over ice in a cocktail shaker. Use a medicine dropper to measure out the rose water.
In the classic 1934 movie The Thin Man William Powell gives a master class on cocktail shaking to a group of bartenders and waiters. According to Nick Charles, Powell’s character, a well-made cocktail is all about timing: “Now, a Manhattan, you shake to a foxtrot. A Bronx, to a two-step time. But a dry martini, you always shake to waltz time.” He places his properly shaken martini on a waiting tray, held by one of the waiters, who serves it back to him. He takes the cocktail and drinks it gratefully, implying that making well-mixed drinks is thirsty work. In a similar vein, tell your digital assistant to play Miami Beach Rhumba by Xavier Cugat. Shake your cocktail to the rhythm. Given the time of year, and our climate, feel free to keep shaking until the outside of your shaker is wet with condensation.
Strain the cocktail into the fanciest cocktail glass you own.
Drink it as you dance around the kitchen.
Gin and lemon lead in this particular rhumba, followed by hints of violets and roses. This is one of those drinks that leave you searching for more of the floral finish, which leads to another sip, and then another, until you realize that you need (a) more excuses in your life to rhumba, and (b) another cocktail.
More rhumbas, fewer alligators.
Featured photo: Dancehall cocktail. Photo by John Fladd.
I could tell that it was an old journal or a scrapbook. It was about 8” by 10”, though it was hard to tell through all the plastic.
“Do you mind if I unwrap it?”
“Knock yourself out.”
It turned out to be a falling-apart scrapbook with more than 150 pages of yellowed newspaper clippings of recipes, most of which seemed extremely old.
“How much were you thinking?”
“Five dollars?”
“Will you take three?”
“Yeah, OK.”
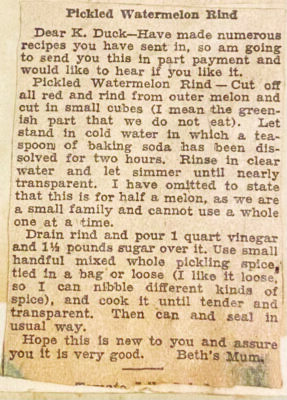
Some online investigation helped identify that the clippings all came from the Boston Globe in the 1920s. Some of these were written by a Globe staff member, but most seem to have been sent in from readers. As a result, the recipes are a little more specific than the “Take a lump of butter the size of a hen’s egg” instructions in really old recipes you find at flea markets sometimes, but being from a time before refrigerators and reliable stoves that you could set to a particular temperature, many of the instructions have a certain amount of vagueness.
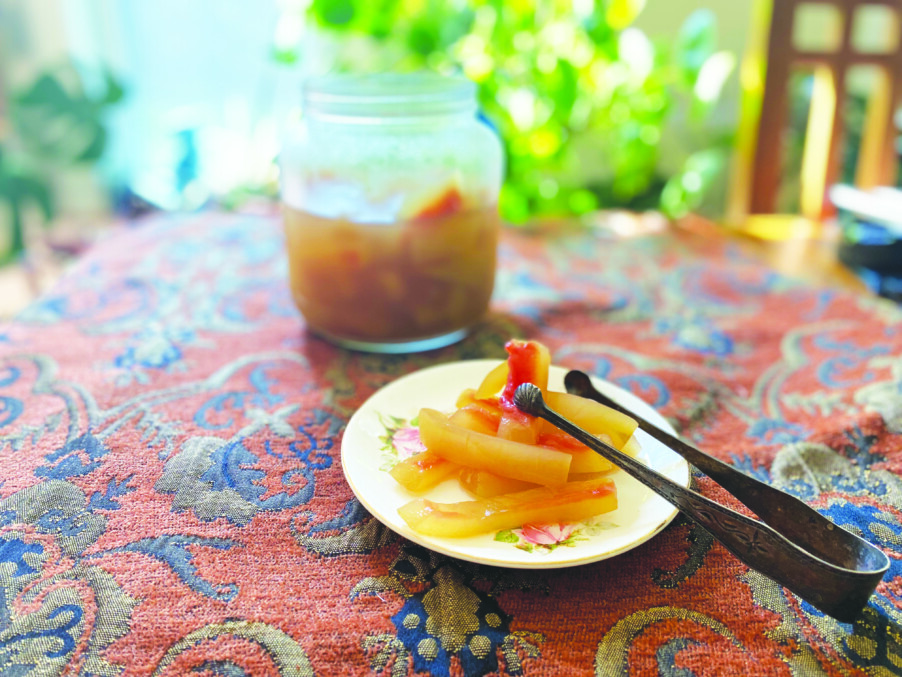
For instance, this recipe for watermelon pickles from the Boston Globe, Tuesday, 28 June, 1927.
One of the things I’ve discovered as I’ve tried cooking some of these hundred-year-old recipes is that many of them make a staggeringly large amount of food. Beth’s Mum writes that she has a small family, so she only uses half a watermelon. Assuming that she’s talking about standard, 15-pound watermelons, that’s still something like 5 pounds of pickles, so I’ve cut this recipe in half, again.
1 baby watermelon – 4 pounds or so
1 Tablespoon baking soda
2 cups cider vinegar
¾ lb. (12 ounces) white sugar
Half of a 3-ounce jar of pickling spice
Cut the melon into slices, then slice the flesh off the rind. Use a vegetable peeler to remove the dark outer skin of the melon. Clean off your kitchen counter, which is now soaked with watermelon juice.
In a large mixing bowl, dissolve the baking soda in water. Soak the watermelon rinds in the alkaline water for two hours, then rinse well.
Transfer the rinds to a large pot of water, and simmer them for about half an hour. This is not as long as Mrs. Mum suggests, but in order to prevent the final pickles from becoming too soft, I’ve reduced the simmering time.
Original recipe. Photo by John Fladd.
Strain away the water, then add the cider vinegar, sugar and pickling spice to the pot. As Mrs. M suggested, I use a small muslin bag to keep the spices from going all over the place. Boil everything for another half hour, until the rinds are barely crisp. (You’re going to want to turn your exhaust fan to “high” for the next 45 minutes; the smell of hot vinegar can be — after consulting a thesaurus for a more accurate term than “aggressive,” I’ve decided to go with “bare-knuckled.”)
Remove the pot from heat, fish out your spice bag, if you used one, then after everything has cooled, transfer the pickles to a large glass jar. These should keep for a week or so in the refrigerator.
These pickles have a robust sweet/sour flavor with a spicy finish. The texture ranges from extremely soft to slightly crunchy. They go really well with sandwiches.
Featured photo: Watermelon pickles. Photo by John Fladd.
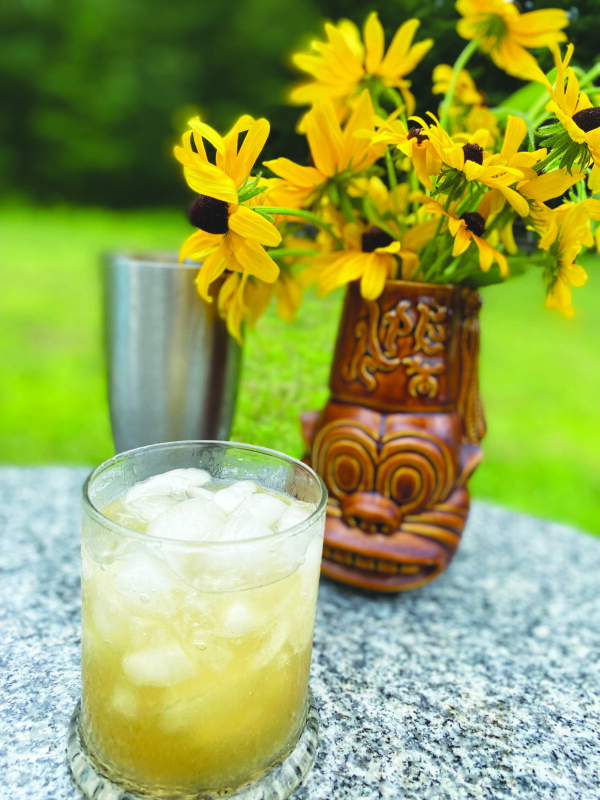
Days like this call for something cold, boozy and tropical, something with a lot of crushed ice.
Mango Rum
Unsweetened dry mango
White or silver rum
With a heavy knife, chop the dried mango into a small dice — very small pieces. Add the chopped mango to a large, wide-mouthed jar, one with a lid. It’s best to look around and find a lid to fit the jar you are using before you get up to your elbows in mangoes.
Add white rum to the same jar — three times (by weight) as much as the mango you just chopped. Could you use vodka, or even blanco tequila, instead of rum? You could, but you would be heading off on a different adventure than the one we are on today.
Seal the jar with a tight-fitting lid, shake it well, then store it someplace cool and dark — maybe in that cabinet above the refrigerator that you always forget about — and shake it once or twice per day, for a week.
Strain with a fine-mesh strainer. Bottle and label it. You will be surprised at how much rum has been absorbed by the dried fruit, but also how much color and flavor the rum has taken on. This rum should keep indefinitely.
Guava Syrup
Fresh guava (Available in international markets, and at Walmart, guava is one of those fruits that you are probably pretty sure you’ve never had before, but you probably have. It’s one of the perfumy background flavors in “tropical” juice mixes.)
White sugar
Juice of half a lemon
Chop fresh guavas into medium-sized pieces, then freeze them for several hours. This is to let the ice crystals poke holes in all the fruit’s cell walls and make it oozier when it’s time to cook with it.
Cook the frozen guava over medium heat in a small saucepan, with an equal amount — by weight — of white sugar. Stir occasionally. As it thaws, the frozen guava will give off a surprising amount of liquid. If you wanted to help it along its way, you could encourage it with a potato masher.
Bring the mixture to a boil. Swirl it around the saucepan to make sure that all the sugar has been dissolved into the syrup.
Remove the mixture from heat, stir in the lemon juice, then strain the syrup with the same fine-mesh strainer that you used for the mango rum (see above). This syrup will keep for several weeks in your refrigerator.
Mango Daiquiri
3 ounces mango rum
½ ounce guava syrup
1 ounce fresh squeezed lime juice, which isn’t discussed above but you can probably figure out
Lots of crushed ice
Wrap several handfuls of ice cubes in a kitchen towel, and beat viciously with a rolling pin or some sort of martial arts weapon that you find lying around, until well-crushed. I like to leave a mixture of different sizes of ice. Fill a large rocks glass with the crushed ice.
Add the mango rum, guava syrup and lime juice to a cocktail shaker, and shake it over ice, until it is very cold. Feel free to shake it longer than you normally would; this is a strong, sweet drink that will benefit from the cold and the melted ice.
Strain the shaken daiquiri over the crushed ice. Call up footage of a beach view of Bora Bora on your laptop. Watch it through half-closed eyes as you drink this daiquiri. If small children try to disturb you while you do this, tell them that you are listening for secret messages that you have to be very, very quiet to hear.
It’s no secret that rum plays well with sweet fruit, which in turn plays well with acidic citrus like lime juice. The first sip of this daiquiri will be sweet, then a little sour, which will make your mouth water, which prepares you perfectly for another sip.
Featured photo: Mango daiquiri. Photo by John Fladd.
We had just come home from a long trip, and I’ll admit that I was a little out of it. Jet lag and a week of over-indulgence had definitely taken a toll on me. And yet I made a surprisingly good decision — there was still time to go to my usual exercise class at the gym and try to clear some of the fog from my brain.
A less good decision was eating two bowls of coleslaw before I left the house.
An hour later found me tripping over my feet and frustrating one of my workout friends.“You are really out of it tonight,” he said, not unkindly. “What’s the problem?”
“Six time zones and a bellyful of coleslaw,” I told him, which stopped us both in our tracks, because that is probably the best title for a blues album ever: Six Time Zones and a Belly Full of Coleslaw
Our theme this week is the blues.
Blueberry Syrup
1¾ cups (250 grams) frozen wild blueberries, the kind you have in your freezer to use for smoothies.
1¾ cups (250 grams) sugar
Juice of half a lemon
In a small saucepan, heat the blueberries and sugar over medium heat, stirring occasionally, until the mixture comes to a boil. Let it boil for a few seconds, to make sure that the sugar has thoroughly dissolved. Because the blueberries started out frozen — Well, they didn’t start out that way. They were young once, and had hope and joy in their hearts, napping in the dappled sunshine, listening to birdsong. — At any rate, because the wild blueberries started today frozen, their cell walls have been pierced by large ice crystals, and they will give up a surprising amount of juice. During this syrup-making process, if you wanted to help things along with a potato masher, who could blame you?
Remove the blueberry pot from the heat, and place a fine-meshed strainer on top of it. Squeeze half a lemon into the mixture. You could use a hand-held, nut-cracker-looking juicer, or one of those reamers that look like a primitive medical device, or even the ends of some kitchen tongs to get all the juice out of the lemon. Because you remembered to put a strainer on top of the pot, you don’t have to worry about getting seeds or pulp into your blueberry mixture. Stir the lemon juice into the blueberry sauce.
Use your strainer to separate the cooked berries from the syrup. Squash the pile of berries with the back of a spoon — a little, a lot — it’s up to you. (Don’t throw them out, though. You have just made very nice blueberry compote to have on toast or stirred into yogurt.) After 15 minutes or so, transfer the syrup to a bottle. It will keep in your refrigerator for several weeks.
Blueberry Margarita
2 ounces blanco tequila – I’ve become very fond of Siete Miserios, lately.
1 ounce blueberry syrup – see above
¾ ounce fresh squeezed lime juice
Combine all three ingredients over ice in a cocktail shaker, then shake until very cold. At this time of year, it will be ready when a thin layer of frost forms on the shaker.
Strain into a cocktail or margarita glass. If you wanted even more ice, the Margarita Police would not stop you.
Sip, sitting in your garden or on your deck (or surreptitiously on a bench in the park), listening to Carlos Santana, who, unlike Life, never disappoints.
Unless you’re a purist, this is everything you want in a margarita at this time of year. It is sweet and sour and slightly smoky and utterly refreshing. Blueberries play extremely well with sour citrus fruit. We tend to pair them with lemons, but they are more than happy to dance with limes. Tequila too, has an affinity for citrus. Even the concept of this drink is refreshing.
Salud.
Featured photo: Blueberry Margarita. Photo by John Fladd.
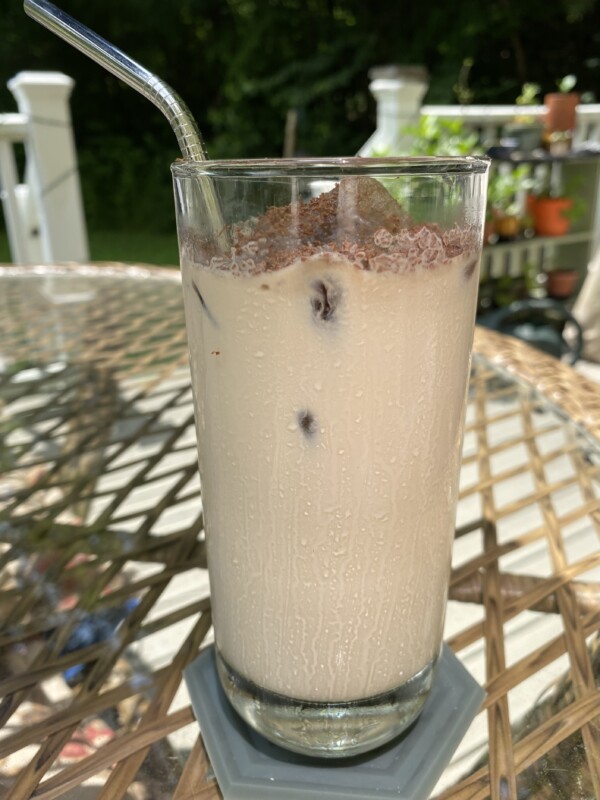
3 ounces cold-brew coffee concentrate – Trader Joe’s makes a very good one.
6 ounces half & half
1 ounce simple syrup
frozen coffee (see below)
dark chocolate, frozen (optional)
Coffee Ice
The secret to truly excellent ice coffee is coffee ice.
We’ve all been there, really, truly enjoying a cup of iced coffee on a bone-deep level. Not guzzling it — we’ve been around the block a few times, and we know that an ice cream headache is a real danger in situations like this, but we’ve also learned the hard way that we don’t make great decisions after ingesting an injudiciously large caffeine bolus.
So we nurse our iced coffee.
The first sip is transcendent.
The second one, 10 minutes later, is still pretty good.
After half an hour, we ask ourselves if it was really that good to begin with. Right now, it’s only so-so.
It eventually sinks in that the enemy here is the ice, gradually, subtly diluting the iced coffee, like an unwanted watery chaperone.
The secret is to make your ice out of coffee. Pieces of coffee ice will melt, but when they do, do you know what they add to your iced coffee? More coffee!
Use leftover coffee to make ice cubes, or make some with cold-brew concentrate.
But it isn’t the 1970s. What if you don’t have an ice cube tray?
Do you have a cake pan? Or a large zip-lock bag? Use one of those to make a block of ice, then chop it up with an ice pick.
But this isn’t a suspense movie; what if you don’t have an ice pick?
Wrap the ice in a tea towel, and swing it over your head, smashing it into the kitchen counter. Do this three or four times and you will have your choice of smashed ice — from coffee snow, to jagged coffee-sicles, to chunks of frozen coffee that will take up half your glass. Use what you want, then put the rest in a Tupperware container in the freezer for your next, inevitable iced coffee.
The actual iced coffee
The question here is how much restraint do you want to show with your iced coffee? The amounts here will make a very respectable 16-ounce serving. Maybe you only need a little pick-me-up. Maybe you have guests. Maybe you have in-laws staying with you. There are any number of reasons why you might want to drink a reasonable, temperate amount of iced coffee.
But maybe you are alone, or Having. A. Day. Maybe the kids or your boss are making extremely unreasonable demands. Maybe you need to drink enough iced coffee to stun a water buffalo. I’m not here to judge you.
The important thing to keep in mind here is the proportions. A one-quart glass jar would work just as well as a juice glass for this.
Pick a glass, then fill it halfway with coffee ice.
Add the half & half and cold-brew concentrate in a 2:1 ratio.
Add enough simple syrup to sweeten to taste.
Stir.
Using a microplane grater, or the tiniest holes on your box grater, grate frozen dark chocolate on top of your coffee, as garnish.
If you think you don’t like iced coffee, you might want to try this. It is creamy and slightly sweet. It isn’t a takeout milkshake pretending to be iced coffee. It’s the real thing. It’s delicately sweet, without much of the bitterness that mass-produced ice coffee tends to have. It starts out pretty innocent, whistling and looking up at the ceiling, but over the course of an hour it becomes more and more grown-up coffee.
Making homemade ice cream isn’t all that difficult. It’s pretty much as complicated as baking — if you follow directions, you’ve got about a 92 percent chance (a statistic I just made up) of pulling off any recipe.
There are a couple of things to keep in mind, though:
1. Don’t believe anyone who tells you that making ice cream is cheaper than buying it. Even if you have any exotic ingredients already on hand, the cream alone will cost you as much as a pint of the high-end store stuff. Also, reconcile yourself to the fact that the ice cream you make might be as good as ice cream made by professionals, but it will probably not be better. The people who make ice cream for a living have it literally down to a science. They wouldn’t be able to stay in business otherwise.
The only good reason to make your own ice cream is to get something that you can’t find easily. Good luck finding a vegan rhubarb-ripple sorbet in the store, but it would not be too difficult to make yourself.
2. Almost all of us have been given the advice to never read the comments at the bottom of any article online. This is especially true of recipes posted there. Of course, I’m not terribly bright, and I tend to ignore that advice when I’m looking for a new recipe.
“I know people can be awful,” I’ll say to myself, “but who could be awful about banana bread?”
Dian from Tulsa apparently, who posts a response to the recipe that goes something like: I thought I would try this, but my husband doesn’t really like bananas, so I replaced them with ketchup, and we’re trying to cut back on the amount of sugar we eat, so I left that out. Also, I’m not really sure what gluten is, but I worry about it, so I replaced half of the flour with sand. Really, I’m disappointed with how this turned out. I won’t be making it again. One Star.
A lot of us are used to playing around with recipes, and making adjustments and substitutions as we go when we are cooking, but have learned the hard way not to mess too much with the ingredients when we bake. Eggs, flour, fat and baking powder perform specific jobs, chemistry-wise, and most of us eventually learn not to play around with a baking recipe until we know it well and understand what each ingredient does.
Ice cream is much the same. Sugar is not just there for sweetness; it plays a role in how hard the ice cream will freeze and at what temperature. The same goes for the dairy, or lack of it. If you decide on a whim to replace heavy cream with fat-free oat milk, the finished ice cream will be very different from what the writer had in mind when she developed the recipe. Until you have made a particular ice cream or sorbet a few times and are really comfortable with it, it’s best to follow the recipe. With that said, many of the recipes here are inspired by ones from David Lebovitz’s The Perfect Scoop (2007, Ten Speed Press). He is a genius, and his recipes are bulletproof.
So why are certain ingredients included in a recipe in particular ratios?
Let’s make some ice cream while we talk about that. Again, one of the best reasons for making your own ice cream is to get a finished product that you won’t be able to buy easily. I like this combination of brown sugar and sour cream.
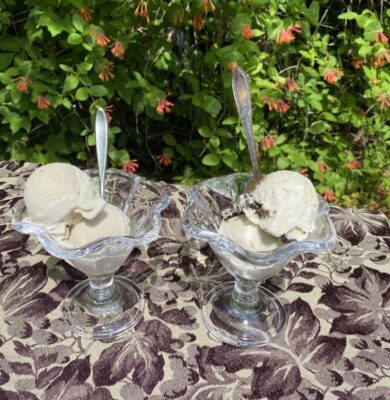
Brown Sugar Sour Cream Ice Cream
Brown Sugar Sour Cream Ice Cream. Photo by John Fladd.
1 cup (250 ml) whole milk
1 cup (150 grams) brown sugar
1 teaspoon molasses (optional)
pinch of salt
5 egg yolks
scant 2 cups (480 grams) full-fat sour cream
1 chocolate chip Clif Bar
Step 1: Combine the milk, brown sugar, molasses and salt in a small saucepan.
The milk provides a base to suspend other ingredients in. A lot of flavors bond themselves well to fat or alcohol. In this recipe we don’t want to mess around with alcohol, because that will affect how the ice cream freezes, but the fat in the milk (about 4 percent) will not only grab hold of the flavor of the brown sugar at a molecular level; it will also help keep the ice crystals small when you freeze it, giving the finished product a creamier consistency. The molasses amplifies the flavor of the brown sugar.
Step 1.5: At this point you need to make a choice: What will you do with the egg yolks?
Egg yolks play a couple of roles here. One is to add fat and protein, which gives the finished ice cream a richer, creamier mouth-feel (an actual industry term). The other is to act as an emulsifier; it helps bond the fat in the recipe — and let’s face it, there’s a lot of it — to the other ingredients. You know the saying that oil and water don’t mix? That’s actually true, so in recipes where you need to use something fatty and something watery — salad dressing, for instance — an emulsifier is used to pull everything together. In the salad dressing, it might be mustard. Here it’s the egg yolks.
The problem with using egg yolks is that they need to be cooked but not too cooked. Nobody wants chunks of scrambled eggs in their ice cream.
There are two ways around this.
The traditional way is something called “tempering.” (If you already know about tempering, skip down to No. 2.) You might have seen this in other sorts of recipes. You heat up a liquid — the milk and sugar, in this case — to just below boiling, then spoon a tiny bit of the liquid into a small bowl with the egg yolks, stirring vigorously. You repeat this several times, simultaneously diluting the egg yolks and gradually bringing them up to temperature. After doing this four or five times, you stir the egg mixture into the milk mixture and whisk it enthusiastically. You keep stirring it until — and here’s the kicker — “the mixture thickens enough to coat the back of a spoon.” It is an instruction that you get in almost any traditional custard recipe, but it can be tricky; I mess it up maybe 40 percent of the time.
The other option is to cheat. Whisk the egg yolks into the milk mixture while they are all still cold, then, whisking constantly, heat them over medium-low heat until they reach 175° F, monitoring the temperature with a probe thermometer or a whisk with an integrated thermometer. The yolks will do their job; if you stir conscientiously, there will be very little cooked egg. You will be covered from a food-safety point of view — the USDA recommends cooking raw egg yolks to 160° for at least 24 seconds, which you will definitely do.
Step 2: Remove the custard mixture — that’s what you’ve done; you’ve made a custard — from heat, and pour it through a fine-meshed strainer. With any luck you’ll only have a few little yellow globs left in the strainer and a little bit around the bottom edges of the pan. Don’t worry about them; the Ice Cream Police will not come after you for this.
Step 3: Let the mixture cool down, then whisk in the sour cream. Chill the mixture in your refrigerator — or an ice bath, if you’re in a hurry — for a few hours. The cooler the mixture is, the faster it will turn into ice cream in your machine.
Step 4: Once the mixture is cold, churn it in your ice cream maker according to the manufacturer’s instructions.
Here’s what the ice cream maker is doing:
If you’ve ever accidentally melted ice cream and then put it back in the freezer, you’ve learned that ice cream is not the same as frozen cream. Frozen cream is rock-hard and more or less inedible. An ice cream churn stirs the mixture as it freezes, keeping it from setting up with large, interlocked ice crystals. It also mixes air into the mixture. The industry term for this is “over-run.” The more air that is trapped in the frozen matrix, the fluffier and easier to scoop the final ice cream will be. Have you ever bought a large tub of ultra-discount ice cream from the supermarket and noticed how light and silky it is? That’s because it’s about 50 percent air by volume. The ultra-premium stuff that you buy by the pint has less over-run and is denser and creamier. When you make ice cream at home you are aiming for that denser consistency.
(You may have watched a cooking competition on television and seen a contestant use an industrial ice cream maker only to have a judge tell them that it is “over-churned,” that the cream has been beaten into butter. That’s a danger with an industrial machine; you don’t really need to worry about that with a home model.)
How long you churn your ice cream depends on a variety of factors that you don’t need to worry about. Just churn it until it is done. This could be anywhere from 15 minutes to an hour. Often, when it’s finished, it will freeze up enough to jam up your ice cream maker, which will whine and complain loudly enough to get your attention and call you over to it. In any case, you are not trying to freeze the ice cream to a scoopable consistency. It should be the same texture as a stiff soft-serve from a roadside ice cream place.
Step 5: While the mixture is churning, chop the Clif Bar into small chunks.
Step 6: When the ice cream is done churning, use a large spoon to layer it with Clif Bar chunks into a container that you will put in the freezer. I like to use one-pint plastic takeout containers or paper ice cream cups that I’ve bought on the internet. A one-quart Tupperware container will work just as well.
Step 7: Label the container and leave it in your freezer for several hours to harden up.
Step 8: About 10 minutes before serving, remove it from the freezer to soften up a little on the kitchen counter.
This is definitely not a flavor that you’re going to find at the supermarket. The sour cream makes this very creamy but adds a background sourness that makes it mouth-watering. The brown sugar and molasses are comforting. That would be satisfying on its own, but the addition of chewy chunks of Clif Bar gives it a contrast in texture that makes you pay attention to what you’re eating and actually think about the flavor and texture of the Clif Bar.
Could you use crumbled-up oatmeal cookies instead of the Clif Bar? Yes, but they would get soggy — which is great if you like that. The Clif Bar is high enough in fat and sugar that it won’t freeze completely solid, doesn’t dissolve into the ice cream, and stays chewy, with little crisp bits that you don’t normally notice.
What’s With the Metric Measurements? Measuring ingredients by weight instead of by volume is a good habit to get into when you are baking or doing some other food preparation that requires precision. Flour, for instance, can vary in weight a great deal depending on whether you use a measuring cup to scoop it out of the bag, or sift it and spoon it carefully into a recipe. When you’re making ice cream and you need to keep track of the ratios of your ingredients, measuring remains important. How finely you chop an ingredient will affect its volume, for instance. If you decide to weigh your ingredients, metric measurements make a lot of sense. Because grams are much smaller units than ounces or pounds, it is easier to get a precise measurement of how much milk or mango puree or Tabasco you are adding to a recipe. Most kitchen scales toggle easily between metric and imperial measurements. Note: For home cooks, milliliters and grams are more or less the same for liquids. If you were a pharmacist, the difference in weight might be significant; the rest of us can use them interchangeably. King Arthur Flour’s website has an excellent conversion chart that is useful for these sorts of measurements at kingarthurbaking.com/learn/ingredient-weight-chart.
How to Make Ice Cream Without a Machine
“This is all great,” I hear you say, “but what if I don’t have an ice cream machine? Am I supposed to buy one and try it out, just to find out if I even like making ice cream?”
Actually no. There is a work-around.
For any recipe for ice cream or sorbet, make the mixture, pretending that you have a machine to put it into. Act innocent. Maybe look at the ceiling and whistle a little. This is to fool the ice cream mixture into a false sense of security.
At the last minute, pull a large plastic freezer bag out from behind your back, and pour the mixture into it. “Sorry, pal,” you might say to the ice cream base, “but we’ve had to make some cutbacks.”
Before it has a chance to complain, seal the plastic bag, squeezing as much air out of it as possible, and put it in your freezer to freeze solid. If you aren’t entirely confident about the seal, you might want to put the bag in a cake pan or something, to make sure it doesn’t leak all over your broccoli.
“Hey, wait a second!” I hear you saying, “I thought we weren’t supposed to freeze it solid. I believe the term you used was ‘rock-hard and more or less inedible.’”
Thank you for paying attention. That would be true if you were planning on gnawing on frozen chunks of cream, but that’s not what you’re going to do.
After a couple of hours, remove the rock-hard frozen slab of cream and peel it out of its bag. Put it on a large cutting board and, using a large knife or a cleaver, cut it into medium-sized chunks, about the size of a hamster or a deck of cards.
Blend the frozen ice cream chunks in your blender, starting on its lowest speed, eventually moving it up to medium speed. If you have a high-end, ultra-powerful blender — the kind that they grind up hockey pucks with on the internet — this will go very smoothly. Your blender will feel totally validated and chuckle smugly. Even if you have a cheap, iffy blender that you picked up at a yard sale, it will take a deep breath, and say, “I got this, Boss.”
After a minute or so the frozen ice cream base will take on a stiff soft-serve consistency, at which point you treat it just as if you’d used a machine.
Here are two batches of Brown Sugar Sour Cream ice cream, one made in a blender and the other using a traditional ice cream maker. They taste identical. There is a small difference in texture: The batch on the left, the one made in the blender, is a little creamier, presumably because the blender beat slightly more over-run (air) into the mixture. It is a subtle difference, though, and if you didn’t taste them side by side you probably wouldn’t notice it. As you can tell, they both scoop well.
The Difference Between Ice Cream and Sorbet Ice cream enthusiasts tend to get hung up on the technical differences between different types of frozen desserts. There are times when the differences are important, but for most of us, most of the time, it is just a matter of word choice. Most of the differences in terms come from the type and amount of dairy that is used. Ice Cream – Almost all the liquid in the recipe is high-fat dairy: whole milk, half & half, or heavy cream. Gelato – This still uses dairy, but mostly whole milk, and no cream. This leads to a denser, more intense ice cream experience. Sherbet – Most of the liquid is water or fruit-juice based, with just a little dairy to make it creamy. Sorbet – There is no dairy at all. It might be zesty and fruity, a lot like a popsicle who knows someone, or it might use coconut milk or a dairy substitute to replace the cream and milkfat. It might be almost indistinguishable from a traditional ice cream.
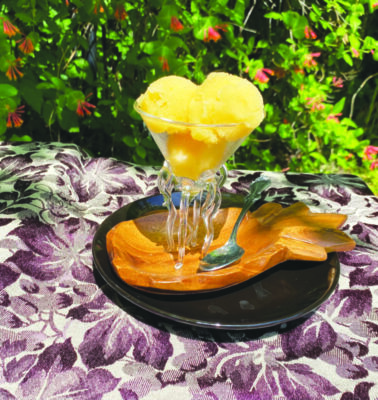
Passion Fruit Sorbet
Passion Fruit Sorbet. Photo by John Fladd.
1-quart carton Goya Passionfruit Cocktail – look in the bottled juice aisle at your supermarket
1/3 cup (66 grams) sugar
zest and juice of two limes
Step 1: Shake the carton of passion fruit cocktail thoroughly, then add all three ingredients to a blender. Blend for 30 seconds or so.
Step 2: Chill for several hours.
Step 3: Blend again, then churn according to your ice cream maker’s manufacturer’s instructions.
Step 4: Transfer to one or more freezing containers, label, and harden in your freezer.
This is a full-blown sorbet, without a hint of dairy. It’s not creamy, but it is scoopable and looks beautiful when you serve it.
Warning: This particular sorbet lends itself to ice cream headaches. I’m not sure why, but self-restraint is your friend here. You might want to pace yourself.
Passion fruit is one of those flavors that you don’t think you’ve ever tasted before, but when you finally do taste it, it will seem really familiar. Actual passion fruits are pretty expensive in the supermarket — about $5 each in our area — but the juice is used in a lot of “tropical” juice mixes, the same as guavas. It is sour and perfumy, utterly delicious. Again, the sourness gives it a mouth-watering quality. It goes very well with lime. This is refreshing. Children tend to really like it.
Could you use the blender method to make this, then add eight ounces of dark rum to the mixture and call it a day and drink it?
Yes. Yes, you absolutely could.
But you would probably lose that day. Again, self-restraint is your friend.
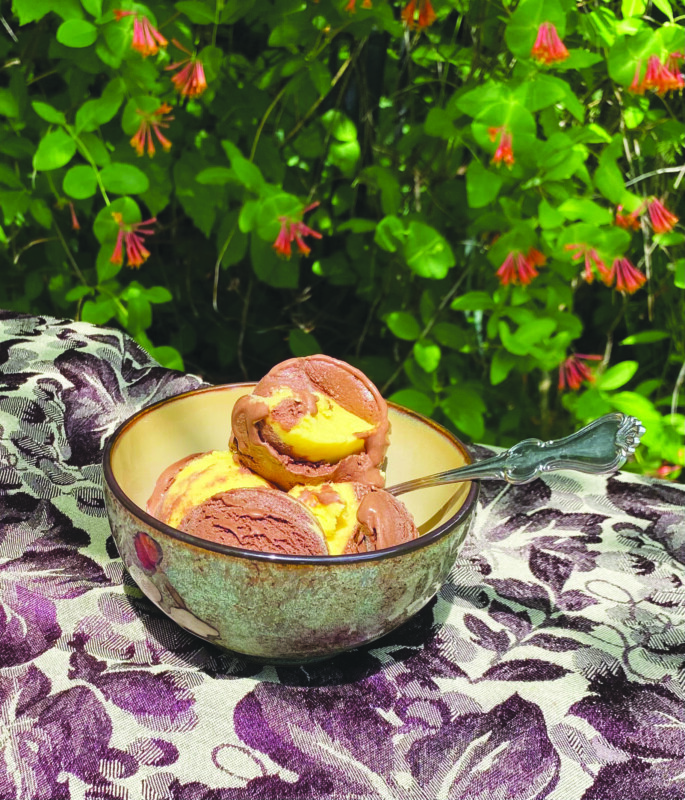
Chocolate-Mango Swirl, a Secret Sorbet
Chocolate-Mango Swirl. Photo by John Fladd.
So, you know how you’ll be watching a cooking show, or even a cooking segment on a morning news show, and someone will make a big point of cooking “healthy” and after making some yes-I-suppose-I-could-eat-it-if-I-was-forced-to, non-fat, cholesterol-free, Very Sad dish, they will take a bite of it, force a smile and tell you that it is “just as satisfying as the real thing”?
You know — and they know, and they know that you know that they know — that whatever they just made is probably fine for what it is, but it is in no way as satisfying as what you actually want.
This isn’t that.
David Lebovitz’s chocolate sorbet is richer and more chocolatey than any actual ice cream could ever be. In fact, because just about its only ingredients are different forms of dark chocolate, dairy could only bring it down. It might be the most pure, intensely decadent form of chocolate you might ever have.
And yet—
Contrast can help bring even the best flavors into focus. Fruit might help here. Orange and raspberry are classic fruits to pair with chocolate, but what about something a little unexpected?
The Chocolate Half of the Sorbet
1½ cups (375 ml) water
1 cup (200 grams) white sugar
¾ cup (75 grams) unsweetened cocoa powder – Dutch process, if you have it (see below)
pinch of salt
6 ounces (170 grams) semisweet chocolate chips (For a completely vegan recipe, read the ingredients on the back of the package carefully. Many semisweet chocolates have trace amounts of milk in them. It is totally OK to substitute dark chocolate.)
¾ cup (180 ml) water
1 to 2 teaspoons vanilla extract
Step 1: Combine 1½ cups of water, the sugar, and the cocoa powder in a small saucepan. Ordinary, plain, run-of-the-mill cocoa powder — which is not the same as hot chocolate mix — is a little acidic. It doesn’t feel completely silky in your mouth. It might even irritate the roof of your mouth a little — something I call the Captain Crunch Effect. In baking recipes, that acidity is balanced by other ingredients, such as baking soda, or egg whites, which are slightly alkaline, but here, you might want to use Dutch Process cocoa, which has already been adjusted to have a neutral pH.
In either case, dry cocoa is what chefs like to call hydrophobic, which under other circumstances can refer to rabies, but in cooking means that it doesn’t like to mix with water; it will float stubbornly on the top of the pot, unless you force it into solution by whisking it vigorously.
Do that.
Step 2: Cook the mixture over medium heat, whisking fairly often – once a minute or so – until it comes to a boil. Whisk it energetically for a minute or so, then remove it from heat. This short boiling will allow the starch in the cocoa powder to form a matrix that will thicken the mixture.
Step 3: Stir in the chocolate chips until they have melted completely, then whisk in the water.
Step 4: Add the vanilla, then whisk the mixture one more time, this time for about a minute. You are whipping in some extra air (over-run). The cocoa-thickened liquid will hold the air in suspension pretty well.
Step 5: The reason many recipes ask you to add vanilla last is that many of the flavor-carrying chemicals in vanilla are volatile and evaporate easily. You want to bring the temperature down — the water did this for you, in this case — before you add the vanilla to keep as much of its flavor intact as possible.
Step 6: Chill the mixture for several hours or overnight before churning it.
The Mango Half of the Sorbet
12.5 ounces (350 grams) frozen chopped mango. This is available with other frozen fruit in your supermarket and is cheaper and easier than using fresh mangoes for this recipe. Because you will be pureeing it, preserving the texture of fresh mango isn’t an issue here.
¾ cup (155 grams) canned coconut cream. This is not the pre-sweetened stuff with the parrot on the label that you used in your youth for dorm-room piña coladas; it is coconut milk with a higher than usual fat content (at least 20 percent), about the same as light cream.
¾ cup (150 grams) vegan half & half. This is usually made from a combination of coconut and almond milks, with a slightly lower fat content.
¾ cup (150 grams) white sugar
pinch of salt
Step 1: Combine all ingredients in a blender. Make sure you shake or stir the coconut cream before measuring it.
Step 2: Blend until thoroughly combined. Toward the end, turn up the speed on your blender to add air to the mixture.
Step 3: Chill, as above.
Combining the Two Sorbets
If your ice cream machine has two canisters, start freezing the chocolate sorbet first; with my machine, I start churning it half an hour before starting the mango.
If your machine only has one canister, or if you are using the “Freeze, Chop, Blend” method, make each of these sorbets separately.
When it’s time to mix them, alternate scoops or large spoonfuls of each in your freezing container. If you are scooping finished sorbets, make sure to mash them together. You aren’t trying to blend them with each other, but to bond the two types of sorbet, so you will get multi-colored scoops when you serve the finished product.
Freeze for a couple of hours before serving.
This is a real show-stopper. The decadence of the chocolate is perfectly set off by the perfumy fruitiness of the mango. It is easy to imagine a scenario where a vengeful monster is about to destroy a city — it looms overhead, crackly with eldritch power, cackling in triumph — when a small child totters forth and offers it a bowl of this sorbet. The creature tastes it, and its evil heart melts, or grows three sizes or something. It kisses the child on the head and heads back to sea, or wherever it came from.
It’s that good.
Even More Decadent – Fooling Around with Alcohol
Alcohol is a tricky addition to ice cream.
Because ice cream is so cold, it turns down the flavor of whatever base you use to make it. Your taste buds are numbed, and the volatile flavor compounds we talked about earlier are less enthusiastic about floating around your palate. If you want a particular flavor to shine through in the finished ice cream, you have to add a fairly aggressive amount of it to the recipe.
This presents a bit of a problem when it comes to alcohol. Because it freezes (or melts in this case) at a very low temperature — about 150 degrees below zero — adding too much of it to a recipe will keep an ice cream from freezing properly. If you don’t add enough of it, you won’t be able to taste it in the finished ice cream.
So what we’re looking for is an alcohol with a strong, boozy flavor, but as low a proof (percentage of alcohol) as possible. Bourbon is a good choice for this. There aren’t many low-proof bourbons out there — they bottom out at about 80 proof (40 percent alcohol), but bourbon carries such a distinctive flavor that a little can go a long way. Because it has its own sweetness, and the barrel-aging process gives it some vanilla and caramel notes, bourbon matches well with sweet flavors, notably milk chocolate.
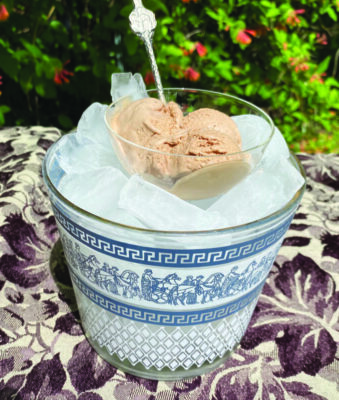
Bourbon-Milk Chocolate Ice Cream
Bourbon-Milk Chocolate Ice Cream. Photo by John Fladd.
8 ounces (230 grams) good milk chocolate – I like Cadbury Dairy Milk for this.
3 cups (750 ml) half & half
¾ cup (150 grams) white sugar
pinch of salt
4 egg yolks
3 Tablespoons (1½ ounces) 80-proof bourbon — Jack Daniel’s works well for this.
Step 1: Combine all the ingredients except the bourbon in a small saucepan. Whisk continually until the mixture reaches 175° F, or temper the egg yolks traditionally (see Brown Sugar Sour Cream Ice Cream, above), then remove from heat.
Step 2: Let the mixture cool thoroughly, then stir in the bourbon.
Step 3: Chill the mixture as much as you can, probably overnight in the coldest part of your refrigerator, then churn according to your machine’s manufacturer’s instructions.
This recipe pushes the alcohol content to its absolute limit. It will not want to freeze; you will have to force the issue. Let it churn for as long as your machine will put up with it (a full hour in my case), then very quickly transfer it to your freezing container and get it into the freezer immediately. Leave it for several hours, perhaps even 24.
What you will end up with is a very rich, milk-chocolatey ice cream with a boozy backbone. It’s very, very good, but it’s very soft. Even at its coldest it will have a pudding consistency, and it will dissolve into a puddle if you look at it too intensely. It is to be served and eaten immediately. Serve all the other ice creams to your dinner party guests before you break this one out. Do not wait until someone has blown out the candles.
Eat it immediately.
Or, hypothetically, you could serve the dish in an ice bath.
A Grownup Ice Cream – Fresh Mint
We all know what to expect from something mint-flavored. It will probably be a lovely green color. It might be shockingly minty, like a peppermint patty, or sweet and a little spicy, like a candy cane.
What we don’t usually expect is for it to taste herbal, which is odd when you think about it, because that’s what mint is — an herb.
This is a mint ice cream for a grownup, for someone who has just made two pool runs and gone to soccer practice and done a load of laundry and gotten eye-rolled for their trouble. This is a find-a-spot-in-the-shade-and-take-five-minutes-to-yourself-while-listening-to-Air-Supply adult ice cream with no M&Ms or cookie dough. It is. Mint. Ice. Cream.
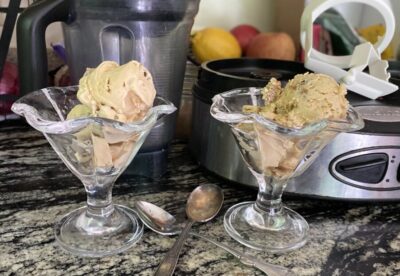
Fresh Mint Ice Cream
On the left is the plain Fresh Mint; the one on the right has chocolate wafers. Photo by John Fladd.
¾ cup (150 grams) sugar
3 cups (750 ml) half & half
pinch of salt
A large bunch of fresh mint – a double handful. At least 100 grams. Perhaps two packed cups. It doesn’t need to be picked or chopped. The stems and leaves are both fine for this, but you probably want to rinse it off. More is better.
Step 1: Heat the cream, sugar and salt in a medium saucepan until just before it boils, 175° to 190° F, stirring occasionally.
Step 2: Remove from heat.
Step 3: Add the mint to the hot cream mixture. Squash it down into the cream with a wooden spoon, until it wilts a little and is almost completely submerged. Cover the pot with a lid or a plate and let the mint steep for one hour, squashing it with your wooden spoon from time to time.
Step 4: Strain through a fine-meshed strainer, chill, and churn, either in your machine or using the “Freeze, Chop, Blend” method, and transfer to a freezing container.
Depending on how much mint you use, this will probably not be an intense Altoid-y ice cream. It will be an ice cream that tastes like actual mint. It has a slightly icy texture, which in this case is an asset; it adds to the refreshment.
Could you smooth it out to make it creamier? Yes, by replacing half of the cream with heavy cream, but try it this way your first time.
Could you add in something to make it a little more family-friendly? You know the plain chocolate wafers your mother used to make icebox cake? You could crumble some of those in layers when you move the ice cream to a container. It will taste like a more sophisticated Girl Scout cookie.
But, you know, ice cream.
Impressing People at a Dinner Party – Lemon Ricotta, Blueberry Swirl Ice Cream
Chocolate has better PR, but if pressed, a surprising number of people will tell you that lemon is their favorite sweet flavor; it’s tangy and floral and its slight sourness has a mouth-watering quality that is a little bit sparkly and magical.
But lemon ice cream has a problem. Lemon sherbet? Totally doable. Lemon sorbet? Piece of cake. But ice cream?
The problem is chemical. Lemon juice is very acidic. On a pH scale of 0 to 7, it has a score of 2. When the proteins in dairy are exposed to acid, you get something delightful, but not necessarily what we’re looking for here — cheese. Getting a finished product that is both lemony and creamy runs the risk of cheesiness. We can lower the cheese factor by not heating this ice cream base, starting with cold ingredients, and by churning it immediately, without leaving it to chill in the refrigerator, but we will still end up with a slightly chewy texture, which leaves us with a couple of options:
We could turn this into a sorbet, by replacing the dairy with coconut cream and almond milk, which would change the flavor slightly.
Or we could really lean into the cheesiness. Lemon has a well-known affinity for ricotta, the cheese you use in lasagna. (Ricotta with a little lemon syrup makes for a really good breakfast, by the way.) Why not go in that direction?
And add blueberries. Blueberries get along really well with lemon and ricotta. Think blueberry cheesecake.
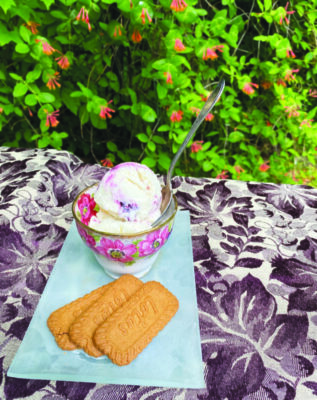
Lemon Ricotta, Blueberry Ripple Ice Cream
Lemon Ricotta, Blueberry Swirl Ice Cream. Photo by John Fladd.
zest of 3 lemons
½ cup (100 grams) white sugar
½ cup (125 ml) fresh squeezed lemon juice, chilled
1 cup (250 ml) half & half, chilled
1 cup (250 grams) full-fat ricotta, chilled
pinch of salt
A jar of blueberry preserves — store-bought is perfectly fine. The sugar and pectin will keep the preserves from freezing solid.
Step 1: Combine everything but the blueberry preserves in a blender, and blend thoroughly.
Step 2: Churn immediately. If you are using the “Freeze, Chop, Blend” method, freeze the mixture quickly as possible, in the coldest part of your freezer. If you have a stand-alone or chest freezer, this is the moment it has been waiting for its whole life.
Step 3: When you transfer the frozen lemon ice cream to its freezing container, layer it with large spoonfuls of blueberry preserves.
This is a delicious — dare I say it? — fancy ice cream. It will have a dense, slightly chewy consistency, but also an unusually pronounced dairy flavor. Often the dairy in ice cream is used largely as a flavor delivery device; in this case it is the flavor. I won’t say that it is an adult ice cream — children like it very much, thank you — but it is a sophisticated one.
Finally, a Cautionary Tale About Making Promises, and Involving Ice Cream Cake
But first, a short story:
Susan knew she was in trouble.
She had promised her daughter Lulu that she would be back from her business trip in time for Lulu’s Orange Belt Test in Taekwondo. She would be gone all week, but she would for certain be back by 6 p.m. on Friday.
Lulu had given her a hard look, then thrust her little finger out at Susan.
“Pinky-swear!” she demanded.
In spite of a slight fluttering in her stomach, Susan pinky-swore. She knew she would make it home in time; her last meeting was supposed to wrap up at 10:30 on Friday. She would have her carry-on bag with her at the meeting and she’d go directly to the airport. What could possibly keep her in Toledo?
A baggage-handlers’ strike, as it turned out, combined with high winds and hail. It was 2 a.m. on Saturday before she staggered through the door at home. She knew she’d be exhausted when Lulu woke her up at 6.
As it turned out, that wasn’t a problem. When she finally got up around 11 and went into the kitchen for some coffee, Lulu got up and walked away into the living room.
As often as she wished for a little peace and quiet, Susan quickly learned that the hostile silence of a 6-year-old grew increasingly soul-crushing as the day went on. She didn’t get any sympathy from her wife, either.
“Hey, you promised me, too. This is a You Problem.”
After a few hours, though, even Carmen started to feel a chill in the air and she took Lulu to spend the afternoon at her mother’s house, giving Susan a few hours to come up with a plan to salvage the tattered remains of her family’s love.
Which, somehow, is how she ended up at the dollar store. Not that she had any actual hope of finding a miracle there, but the dollar store is where Susan went when she needed to be inspired, creatively.
She found her answer in a display by the door, even before she went inside. Ten dollars and five minutes later, she had what she needed.
Susan wasn’t much of a baker, but she did have a strawberry cake mix in the cupboard at home, and half a gallon of strawberry ice cream in the freezer, so it seemed like a no-brainer to use a sandcastle mold from the dollar store to make a Pink Princess Ice Cream Cake.
It turned out to be a little harder than she anticipated.
It can’t be denied that this was a disappointing setback, but Susan’s father had always said that God hates a coward, so she refused to give up.
She still had a couple of hours to work with, so, stopping only to give the Gloppy Castle Cake to the heavy metal band who practiced in the garage next door — who subsequently declared her to be the Awesomest Chick Ever and asked her if she wanted to join the band (an idea she decided to put a pin in until she saw how the rest of the afternoon panned out) — Susan made another run to the dollar store and the supermarket, and tried again.
This time she used a more traditional sand bucket with sloped sides, which worked pretty well. By the time she added pink balloons, pink ribbons, a pink tablecloth and pink utensils, she had a credible Pink Bribe to offer Lulu when she got home, who decided to forgive her, even though she had decided that she didn’t like pink anymore and really wanted zebra stripes.
Carmen agreed that Susan had more or less redeemed herself, but wondered why she had used a children’s sand bucket as an ice cream mold, instead of a spring-form pan.
“A what, now?” Susan asked.
“A spring-form pan. You know, the pan with the ski-boot buckle on the side that I use for making cheesecake?’
“That’s just for cheesecake, though, isn’t it?”
…
“I’m not really very bright, am I?”
“That seems to be the theme of the weekend. Let’s make some strawberry margaritas.”
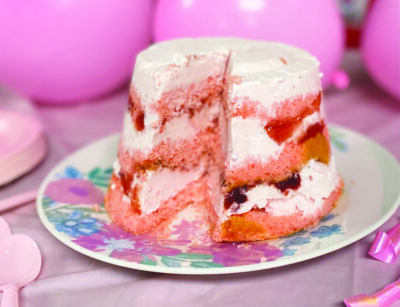
Triple Strawberry Ice Cream Cake
Triple Strawberry Ice Cream Cake. Photo by John Fladd.
1 half-gallon carton of strawberry ice cream
1 box of strawberry cake mix, and the ingredients to make it
1 large jar of strawberry preserves
Step 1: Line the bottom of a large spring-form pan with parchment paper, then bake a strawberry cake in it, according to the directions on the box. Allow it to cool.
Step 2: Remove the cake from the pan, and chill the pan in your freezer. Meanwhile, use a bread knife to slice the cake in half across the middle, so you have two thinner cakes, not two semi-circular ones.
Step 3: Remove the strawberry ice cream from the freezer to soften slightly.
Step 4: Reline the bottom of your spring-form pan with more parchment paper.
Step 5: Scoop half the ice cream into the bottom of your pan, and smash it down with a spoon to completely fill the bottom section.
Step 6: Add a layer of cake. Because you baked it in this pan, it should fit perfectly. If you didn’t think things through, and used a child’s sand bucket, you will have to do some measuring.
Step 7: Use a large spoon to spread strawberry preserves across the cake. How much you use is up to you.
Step 8: Spread more preserves on the other half-cake.
Step 9: By this time the rest of your ice cream should have softened enough to add it to the cake in the pan without having to squash it too much. Do that, then flip the remaining half-cake, jam-side down into the pan, on top of the ice cream.
Step 10: Cover the final cake layer with plastic wrap, then put everything in the freezer to firm up.
Strawberry Margarita 2 to 3 frozen strawberries – approx. 50 gram, or 2 ounces 1½ teaspoons white sugar 2 ounces blanco tequila – I like Hornito’s for margaritas 1 ounce fresh-squeezed lime juice
Step 1: Thoroughly muddle the strawberries and sugar in the bottom of a cocktail shaker. I use a large pestle from a mortar and pestle; the handle of a hammer would work well for this. Step 2: Add the tequila, then dry-shake the mixture. This means without ice. The tequila will do a good job of bonding with the fruity compounds in the strawberries. Step 3: Add lime juice and ice, then shake again, until very cold. Step 4: Strain into a cocktail glass, and drink while it is still blisteringly cold. Unlike traditional Mexican Restaurant Strawberry Margaritas, this tastes strongly of actual strawberries and lime. It is best very cold, but not frozen. Haven’t you had enough frozen treats, already?