Because I am a humble man, I don’t often bring this up, but it has bearing on today’s topic, so I’ll say it now and get it out of the way, so we can move on.
I make the World’s Best Breakfast Sandwich.
I know; it seems unlikely. You’d expect the inventor of such an important — dare I say, landmark? — development to be a tall, handsome, strapping man of great intelligence and taste. You’d be disappointed.
And, of course, you’ve got the lunch-counter lawyers who will want to get into the whole, “How can you quantify matters of personal preference?” Some people might even argue, “How do you even define the word ‘sandwich’, anyway?” — you know, the same people who like to start the argument about whether a hot dog is a sandwich or whether breakfast cereal is soup. Those jerks. [Editor’s note: Hippo totally and with troublemaker intent stirred this pot in our Best of 2022. Hippo readers pretty definitively said 76 to 24 percent that a hot dog is not a sandwich.]
But the fact remains that there is one clear best breakfast sandwich, and I’m the guy who invented it. I am so confident of this that I have it on my resumé, which has provoked several extended discussions during job interviews. I haven’t always gotten those jobs, but by the time I left, the various hiring committees knew what to make for breakfast the next morning.
Here is how you make it:
Toast one slice of plain, ordinary, white sandwich bread. If you try to use a snobbier, artisanal bread, this whole dish will collapse philosophically.
Spread the bread with a confident layer of peanut butter — natural, processed, it doesn’t matter. It has to be actual peanut butter, though. Almond butter, sunflower butter, tahini, these are all fine, admirable ingredients but this is not the job for them.
On top of the peanut butter, arrange a layer of pickled jalapeños — not fresh ones, not a splash of hot sauce. Pickled. Jalapeños.
Top the jalapeños with a fluffy scrambled egg. Not egg whites. Not whipped tofu.
Scrambled. Egg.
“Yeah, but I like a fried egg, and I don’t really see why—”
Shhhh.
One. Scrambled. Egg.
Season with a pinch of coarse salt and fresh ground pepper.
You and I both know how this is going to go down:
You’re going to try to prove how open-minded you are and you’ll make this — well, a version of it, anyway. You’ll substitute a self-respecting slice of sourdough for the sandwich bread, or you’ll use some fresh chiles you’ve got growing in your garden. You’ll make it, and eat it, and shrug your shoulders and say, “It’s OK, but I’m not sure what he’s making such a big deal about.” And you’ll move on with your life, burdened with just a little less respect for me than you had before.
And then, one day, when you need it most — when it is freezing rain outside, and the character you love the most on that show you like has gotten herself killed by a radioactive wombat, and work is terrible, and you just had a big fight, and you hate the world — on that day, you will make this sandwich the way it was meant to be eaten and you will feel the fragments of your broken heart start to slip back into place.
“OK,” I hear you say. “This is all certainly very … colorful and all, but what — if anything — does this have to do with cocktails?”
Oh, right.
I’m sure you already know this, but this Friday is the 94th anniversary of the first commercially sliced bread, which is, of course, one of the key developments that make this sandwich possible. And as long as we’re talking, in a roundabout sort of way, about bread that doesn’t get enough respect, let’s make a cocktail that honors another forgotten hero of the bread world: pumpernickel.
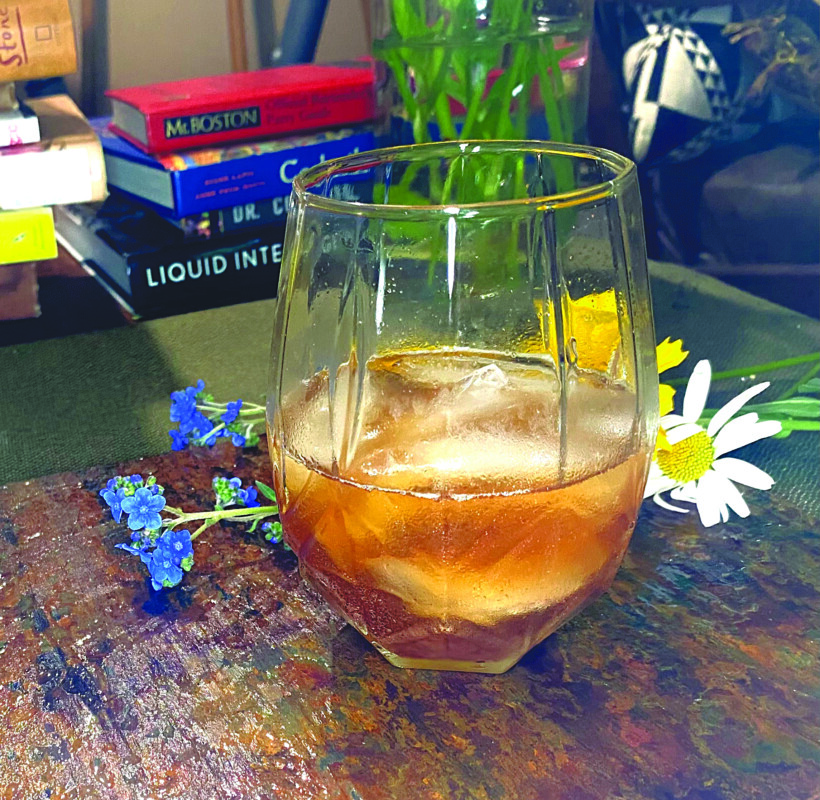
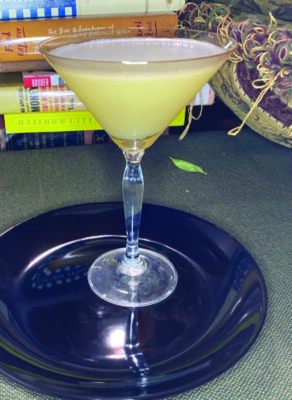
Pumpernickel Manhattan
Ingredients
1 Tablespoon caraway seeds
1 Tablespoon cocoa nibs
1½ ounces rye whiskey – I like Maker’s Mark
1½ ounces red vermouth
10 drops cardamom bitters
10 drops orange bitters
Thoroughly muddle the caraway seeds and cocoa nibs in the bottom of a cocktail shaker. (You could also use a mortar and pestle for this.) Add the rye, and swirl to combine.
Leave the whiskey, caraway and cocoa nibs for at least an hour, to get to know each other better.
Using a fine-meshed strainer, strain the rye over ice, in a mixing glass. Add the vermouth and bitters, then stir gently.
Pour into a rocks glass, and sip slowly.
Pumpernickel — the bread — is a close cousin of rye bread; that’s why we’re using rye for this Manhattan, rather than the more traditional bourbon. Its dark color comes from cocoa powder, and like all self-respecting ryes, it has caraway seeds to give it some [vague, punching motion]. As with any self-respecting Manhattan, the predominant flavor here comes from the whiskey — this is why we’ve used a fairly upscale rye — but the caraway and cocoa linger and remind you who you are dealing with. They are subtle about it — it doesn’t shout, “CARAWAY! WE’VE GOT CARAWAY, HERE!” but they leave you thinking about the finer points of pumpernickel bread.
As you should.
Featured photo. Pumpernickel Manhattan. Photo by John Fladd.
Let’s say, hypothetically, that you are a teacher. You’ve finally broken down your classroom, covered all your bookcases with paper and answered the last of the emails from angry parents. Or, hypothetically, you’ve just pulled your last shift for the week at the convenience store, waiting on increasingly angry customers, who have never learned to say “Please” or “Good morning” and want to know why you, personally, have raised the price of gas.
Or, hypothetically, you’ve wrapped up another week at the DMV where—
You know what? Let’s just stipulate that you are feeling worn out and a little bit battered, emotionally, and now you’ve got a few precious hours to yourself to sit on the deck, or wallow around in an inflatable pool, and get your Cool back.
Because you are cool. You have distinct memories of being cool, sometime in the distant past. “You’re so cool!” somebody told you once. Or you think they did. Or was that a movie? It might be Samuel L. Jackson or Helen Mirren you are thinking of.
Anyway, you know that there is some cool floating around somewhere and you’re pretty sure you can absorb it, if you can just unclench your shoulders and let it soak into you.
Here’s an unsolicited suggestion of how to do that.
Step 1 – Music
Put on “Take 5” by Dave Brubeck or “A Taste of Honey” by Herb Alpert.
I know — this isn’t your usual music; it’s something you imagine some old, not-cool person would listen to. Trust me on this. You can listen to your regular country or heavy metal or Mongolian opera later. For now you need this very specific type of jazz. Remember that shoulder-unclenching we talked about before? This will help you do it.
Step 2 – Take Your Shoes Off
Do it. Even if you’ve been wearing sandals all day, sitting in bare feet will send a message to your clenching parts.
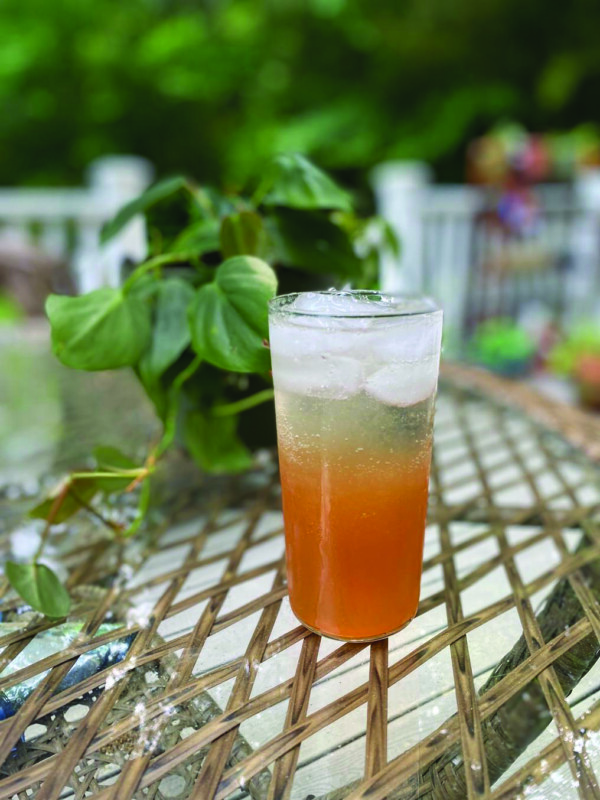
Step 3 – Drink This (It’s a Process)
Take Five
Ingredients
2 ounces mango-infused rum (see below)
1 ounce fresh squeezed lemon juice
¾ ounce rhubarb syrup (see below)
1 bottle or can of your favorite seltzer — I like Topo Chico
Combine the rum, lemon juice and syrup in a cocktail shaker, and shake over ice.
Pour into a tall Collins glass. Top with seltzer.
This will be sweet and tart and definitely like something somebody cool would drink, except—
Maybe? Maybe, it’s a little too sweet and boozy?
Take another sip to be sure.
Yup, just a little too concentrated. But, hey! Look at that! There’s an inch or so of room at the top of the glass now, for more seltzer. Top it off again.
Now, it’s perfect. **Sip, sip**
Oh — and look! There’s a little more room in the glass; better top it off again.
Still perfect. Slightly different, but absolutely delightful. **Sip, sip**
And again.
Eventually, you’ll run out of seltzer, which would be a really good excuse to make a second drink.
This time, try listening to Louis Armstrong sing, “Just One of Those Things.” Trust me.
Mango-Infused Rum
Combine 4 cups of white rum with 5 ounces or so of dried mango in your blender. Blend it to a rough-smoothie consistency.
Let the mixture steep for an hour or so, then strain it through a fine-meshed strainer and bottle. The mango will hold onto a fair amount of the rum, but you will be left with a beautiful, apricot-colored alcohol that will look really good in your liquor cabinet and taste like reggae music.
Rhubarb Syrup
Combine an equal amount, by weight, of frozen diced rhubarb and white sugar in a small saucepan. Cook over medium heat, stirring occasionally, until the rhubarb gives up its juice and the syrup mixture comes to a boil.
Remove from the heat, cover, and allow it to steep for one hour.
Strain through a fine-meshed strainer, pressing on the rhubarb to encourage any additional liquid to drain out.
Bottle the syrup, and keep it in your refrigerator. Add the juice of one lemon to the rhubarb, and eat it on ice cream.
In her Little House books Laura Ingalls Wilder made a big deal out of the changing of the seasons. Fall was an obvious one with all the emphasis on the harvest, etc., but springtime was also a really big deal for her.
In one of the books — I don’t specifically remember which one — she goes into a four- or five-page reverie about her mother making the first salad of the year. She describes the lettuce that she grew, and how her ma would make a dressing out of bacon drippings and vinegar.
“Oh, Ma!” the barefoot kids would cry, “Salad!”
“Hooray! Salad!”
“By gum, Caroline,” her Pa would say, “You beat everyone else all hollow for making salad!”
And Ma would blush, and admit that while it wasn’t perfect, it was, in fact, a pretty good salad.”
And I, as a child of the ’70s, would stop reading briefly, and shout at the book.
“Seriously, people! It’s a salad! Get over it!”
What I didn’t or couldn’t realize at the time was that this frontier family had just come off a winter of living on potatoes, salt pork and hardtack, and now even the potatoes were gone. They all had early-stage rickets and scurvy. Fresh, leafy greens must have hit their systems like a vitamin A speedball.
Now, while we haven’t spent the winter locked up in a one-room shanty on the prairie, we are coming off a long takeout and frozen dinner jag. Many of us have spent the past week or two standing in our gardens, hands on hips, staring down at the seedlings and going, “WELL?!”
The big stuff — the cucumbers, tomatoes, and corn — is still a long way off, but we are starting to get a few tiny things, vegetable flirtations, if you will, from our gardens.
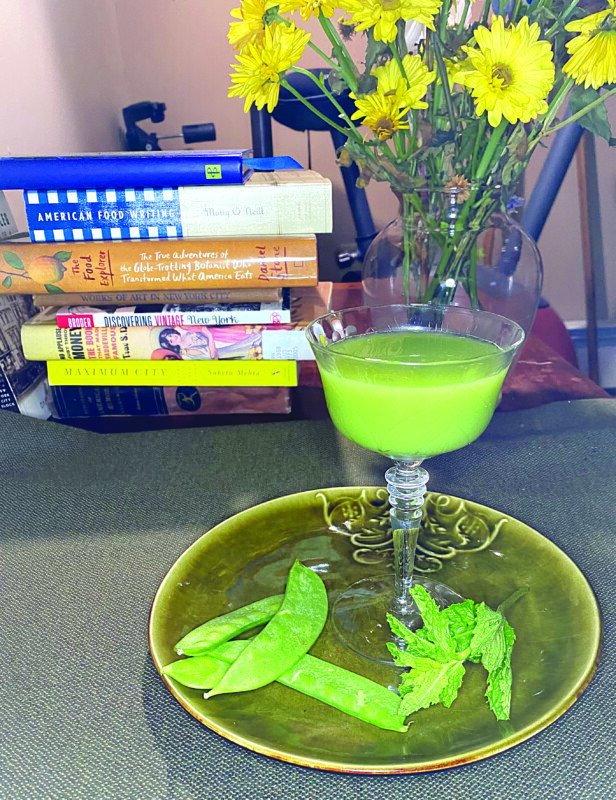
Springtime Cocktail #1
Peas and mint are a classic combination. My question was a matter of ratios — how much mint to how many peas?
I looked through many, many recipes and found very little agreement. But Martha Stewart advised 10 ounces of peas to 1/3 cup of mint leaves, and if there is anyone I would put blind trust in on this matter, it would be Martha.
The great thing about this recipe is that aside from washing the peas and mint, you don’t have to pluck, chop or process them in any fussy way.
Preparing the gin:
1/3 cup (8 grams) fresh mint — Don’t worry about plucking the leaves. The stems will work well here, too.
10 ounces fresh sugar snap peas or snow peas in their pods
10 ounces (285 grams) medium-quality gin — I used Gordon’s
Measure all three ingredients into a blender — a kitchen scale is excellent for this.
Blend thoroughly for a minute or so.
Leave the mixture to steep for an hour.
Strain with a fine-meshed kitchen strainer.
Your yield will be about a cup (8 ounces) of Bright Green Gin — enough for four cocktails.
The cocktail itself:
2 ounces Bright Green Gin
1 ounce fresh squeezed lemon juice
¾ ounce amaretto
Combine all ingredients with ice in a cocktail shaker.
Shake.
Strain into a chilled coupe glass.
This is what I call a classic Utility Cocktail recipe — two parts alcohol, one part citrus juice, ¾ part syrup or liqueur.
Amaretto has a reputation of being a bully and taking over any drink it’s a part of. When used judiciously, it is an excellent team player. Peas go extremely well with mint – that’s a given. They also go with lemon and with almonds. All these ingredients play extremely well together.
The first thing you notice, of course, is the color, a bright vibrant green that even the amaretto won’t dull. The pea flavor is distinct but not overly assertive. The acid of the lemon juice brightens everything up.
It is startlingly delicious.
And holds off scurvy. There’s no sense in taking chances.
(One observation: The Bright Green Gin has a short shelf life. It will start losing its vibrant color and flavor within a couple of hours, so it is best to drink it right away. This is a perfect before-dinner cocktail to share with friends, or for two of you to have two apiece.)
Featured photo. Springtime Cocktail. Photo by John Fladd.
When we think of summer drinking, cocktails usually aren’t the first thing to spring to mind.
We imagine a friend tossing a cold can of beer to someone at a clam bake, or sharing a bottle of chardonnay on ice on the deck of your summer house in the Hamptons. (I assume that you are a fancier person than me; it sort of goes without saying.) Mixed drinks fall somewhat farther down on the list.
But when we do get to actual cocktails, I, at least, find myself thinking about pitcher drinks. The idea of sharing extremely cold drinks with a group of friends seems really appealing. So let’s look at five summer drinks that lend themselves to pitcher-izing.
Because drinking cocktails by the pitcher is a generally social activity, let’s look at some potential parties that don’t require a huge amount of effort but complement those drinks. At the same time, that intensity of socializing can be stressful for some people, so let’s also include two summer drinks that lend themselves to drinking quietly and alone.
Getting Started – How to Scale Up a Cocktail Recipe
At first glance, making drinks by the pitcher seems pretty straightforward — just multiply each ingredient by the number of people you want to serve.
As soon as you start to do that, however, things get confusing.
“I want to make five of these, but will they fit in that pitcher? And what about the ice? Is there some sort of formula to calculate the volume of ice cubes? Does pi get involved somewhere in there? HONEY? DO YOU REMEMBER WHAT PI IS?”
As it turns out, math is involved, but it’s friendly Schoolhouse Rock-type math, not the “Two trains leave the station traveling in opposite directions” type.
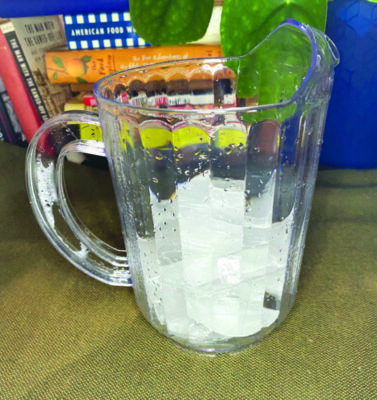
• First, get yourself a pitcher. I used a standard 60-ounce food service pitcher — the type you would get drinks in at most restaurants. I wanted to be authentic about all this, so I bought it at a restaurant supply store.
• Next, add ice. It doesn’t matter what type of ice you use at this point — the stuff your freezer makes for you, ice tray ice, novelty shaped ice from a silicone mold, block ice that you’ve attacked with an ice pick (and if you’ve never tried that before, I heartily recommend it) — any of it will work. Fill the pitcher up about 1/3 of the way with the ice of your choice.
• Just add water. Top your pitcher off with water. It doesn’t have to be to the extreme, worrying-about-spilling-it top — just fill it to the level that suits you. The amount of water you just added is the same volume as the drinks you will want to make in this pitcher.
• Measure the water. This is where the math comes in. Remain calm. Pour the water out into a separate container, so you can measure it. Use a kitchen strainer and another pitcher or a large bowl to hold the water. Now measure it.
I like to use a digital kitchen scale, because mine has an option to measure ingredients in milliliters. If you want to use a scale but it doesn’t have the milliliter option, grams will work just as well. (Important tip: If you are a pharmacist, grams and milliliters are not the same thing. If you’re cooking or mixing drinks at home, they pretty much are.)
Alternatively, measure the water with your largest measuring cup. If yours has measurements along one side in fluid ounces, you are golden. Just write down how many ounces of water you just poured out.
The rest of us will have to do some calculations.
For instance, according to my kitchen scale, the non-ice volume of my pitcher is 1,240 ml. A quick internet calculation — “Convert 1,240 ml to fluid ounces” — indicates that I’m looking at a final cocktail volume of around 42 fluid ounces.
A pitcher with a drink-ready amount of ice. Photo by John Fladd.
Let’s say I’m making a pitcher of daiquiris. My recipe calls for two ounces of rum, an ounce of fresh-squeezed lime juice, and ¾ of an ounce of simple syrup. That works out to 3.75 ounces.
Now the math. Are you ready?
Divide the big number by the small number.
That’s it.
42 divided by 3.75 equals 11.2. Let’s round that out to 11. (You are welcome to round up or down freely; you can make up any difference with more or less ice.)
Now I know that for a pitcher of this particular drink I’ll need to multiply each ingredient by 11. I’ll make each round of drinks in the pitcher, adding the ice last, to bring the volume up to where I want it.
Which means that it’s time for a party.
Party #1: A Piñata Party
When my wife and I got married, we decided to have a backyard cookout for our rehearsal dinner. My wife planned the menu, chose the music, cooked five or six different side dishes, coordinated parking and got hotel rooms — in distantly separate hotels — for my parents.
I bought a piñata.
In my defense, the piñata was a solid call. My friends and family exist in a swamp of anxiety and social awkwardness that would intimidate the reed marshes of the Nile Delta. It was somewhat inevitable that at some point one of my friends would tell an off-color joke to a nun, or my mother would have a “just-being-honest” moment. If — OK, when — things got tense, I could shout out, “Hey, everybody! It’s piñata time!” We’d break open a piñata, people would be distracted, and we could quietly shuffle the conversation groups around.
I bought a piñata shaped like a large, red parrot. Because this was a special occasion, I went to a chocolate store and bought a couple hundred round, foil-wrapped truffles, and filled Polly pretty much to the top. I put her on the stairs leading up from the basement, where she would stay cool but we wouldn’t forget her.
On the day of the rehearsal, my soon-to-be father-in-law kept tripping over the parrot. He didn’t know what it was, but he knew it was in his way, so he relocated it to the kitchen counter, where he wouldn’t have to deal with it.
The piñata was now in my soon-to-be mother-in-law’s way, so she tasked my 6-year-old nephew with finding someplace to put it. He put it in the only empty space he could find — in the sun on the deck.
To make a long story short – several hours later, things did get awkward and tense at the dinner. I did announce “piñata time!” My new brother-in-law laid into the piñata with an awesome move he’d seen in a samurai movie. The piñata burst, splattering everyone at the party with melted chocolate. My wife’s maid of honor made a joke about “parrot blood” and a small child cried so hard that she did that dancing-in-place thing that only truly traumatized kids can do.
So, what I’m saying is that I’m a big fan of piñatas. And as such, I’d like to put in a word for making your own.
(1) Professionally made piñatas are built like dump trucks. They are almost impossible for casual, perhaps slightly inebriated, party-goers to break with a stick. This makes sense when you consider that they have to survive shipping from the piñata factory intact. If you make your own out of papier mâché, you can make it as fragile as you like.
(2) The hole in a standard piñata is about the size of a golf ball, which severely limits creative stuffing options. If you make your own piñata, you can leave a large access hole, fill it, then paper over the hole. In the reference photo to the right, I have filled my partially completed piñata with a copy of the Mr. Boston Bartending Guide, 10 pairs of socks and a can of chickpeas, with enough room left over for a live cat. [Editor’s note: This is just a fanciful amount-of-space descriptor. Do not attempt to put a live cat in a piñata. Don’t @ us, cats.]
What drink accompanies a piñata?
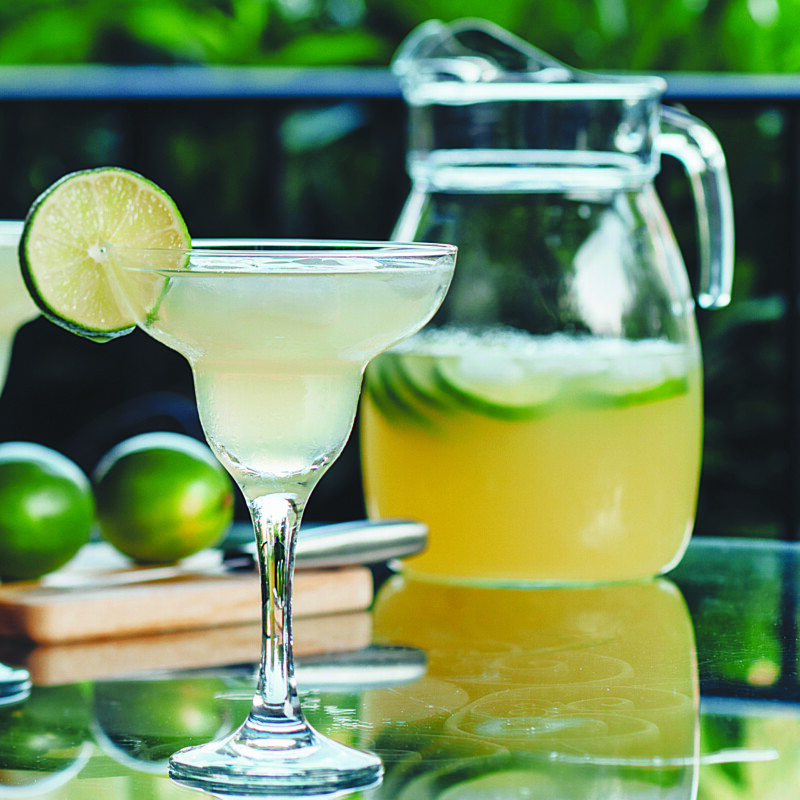
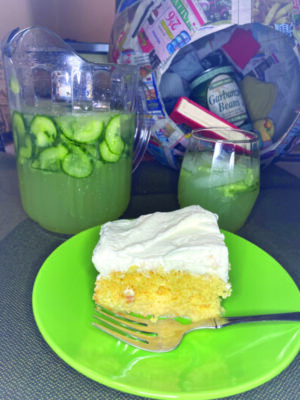
A margarita is a summertime classic; a cucumber one, doubly so. There are only three ingredients in this, so you will probably want to splurge on a decent tequila. The bar in Albuquerque where I first had this suggested Hornitos. Who am I to argue with them? This is a pitcher-drink natural.
One Cucumber Margarita
3 slices (~45 grams) cucumber with skin
2 ounces Blanco tequila – I prefer Hornitos
1 ounce fresh squeezed lime juice
¾ ounce cucumber syrup (see below)
Muddle the cucumber slices thoroughly in the bottom of a cocktail shaker.
Add ice, lime juice, syrup and tequila. Shake until very cold.
Strain into a chilled rocks or margarita glass.
A Pitcher of Cucumber Margarita
1 medium cucumber, unpeeled and sliced – about 300 grams.
22 ounces blanco tequila – roughly 3 cups
11 ounces fresh squeezed lime juice
7 ounces cucumber syrup – one scant cup
Muddle the cucumber slices in the bottom of your pitcher. I use the pestle from my largest mortar and pestle — it’s about the size of a billy club — but a potato masher would work well, too.
Add the lime juice, syrup and tequila. Stir gently but thoroughly. Top the pitcher off with ice, and stir again.
This pitcher recipe is deliberately a little intense. If you prepare it about 20 minutes before serving, the ice will dilute it just enough. It will be perfect.
Cucumber Syrup
Ingredients
Equal amounts, by weight, of cucumbers and white sugar. Any type of cucumber — whatever makes you happy, or is threatening to take over your garden.
Wash, but don’t peel, the cucumber. Chop it to a medium dice.
Freeze the cucumber chunks for an hour or so. Ice crystals will form and perforate the cell walls inside the cucumber, making it more enthusiastic about giving up its juice.
Combine the frozen cucumber and sugar in a saucepan, over medium heat, stirring occasionally. As it thaws, the cucumber will start giving off a surprising amount of liquid. You really won’t need to add any water.
As more liquid appears, mash the cucumber with a potato masher, just to encourage the process along.
Bring the mixture to a boil, and let it boil for 15 or 20 more seconds, to make sure the sugar is completely dissolved into solution.
Remove the pan from heat, cover, and steep for 30 minutes.
Mash with the potato masher one more time, then strain and bottle.
This isn’t actually a step, but have some of this cucumber syrup on your yogurt. You will start smiling at people in traffic.
Cucumber Margarita and Tres Leches Cake. Photo by John Fladd.
Julia Child once said that any party without cake is just a meeting. She was very wise.
If you aren’t familiar with Tres Leches Cake, you are in for the dessert ride of your life. It is the Prince of Cakes and a perfect accompaniment to our margarita and piñata.
Tres Leches Cake
Ingredients
1 boxed yellow cake mix + ingredients needed to bake it.
1 12-ounce can evaporated milk
1 14-ounce can sweetened condensed milk
1 cup (8 ounces) half & half
2 cups heavy cream
simple syrup to taste
Prepare the boxed cake mix according to instructions, in a 9×13” pan.
Allow it to cool thoroughly.
Using skewers or sharp chopsticks, poke holes in the cake, every ½ inch or so.
Mix evaporated milk, condensed milk and half & half together in a large measuring cup.
Pour over the cake, still in its pan. It will puddle on top; do not panic. The cake will eventually absorb all three milks (todos de tres leches).
Cover and chill in the refrigerator for at least eight hours. This cake is at its best ice-cold. The extra time in the fridge will also allow the cake and milk mixture to meld at an almost philosophical level.
Just before serving, whip the heavy cream with just enough simple syrup to be lightly sweet. Cover the cake with the whipped cream.
“Wait a second!” you say. “That’s not tres leches! The whipped cream makes it cuatro leches!”
And you’re right, of course. Nevertheless, whether or not this cake is misnamed, you will become a convert after your first — then your inevitable second, third, etc. — bite.
Do you remember mushing birthday cake together with vanilla ice cream when you were a kid? The mixture of cake and ice cream was one of the best parts of going to a birthday party. This is like that — only thought out and designed to provide the perfect cake-to-dairy ratio. The slightly stodgy sweetness of the cake is balanced by the ice-cold milk glaze that you have soaked it with. If you use a light hand with sugar syrup in the whipped cream, you will balance the in-your-face nature of the dairy-soaked cake with something unexpected: subtlety.
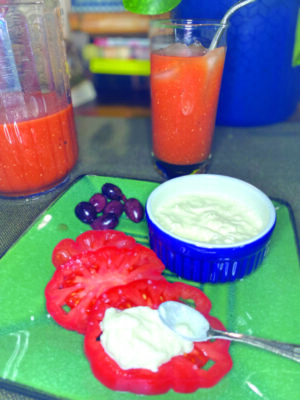
Party #2: A Tomato Brunch
Burrata is the piñata of cheese.
Imagine a shiny, white, perfectly smooth ball of mozzarella, sitting modestly on a plate.
Now, imagine an Italian hand model — let’s call her Bianca — picking up a silver serving knife, and gently but firmly cutting into it, revealing an inside filled with cream and a fluffy über-cheese called stracciatella.
We might stand in a mild state of shocked wonder, and think vaguely about asking for some of this burrata — because that is what it is called, burrata — but we wait just a little too long and miss our window of opportunity. Bianca deftly transfers the burrata — mozzarella, stracciatella and all — to a serving platter and carries it out to the balcony, where a count in a tweed jacket waits for her.
Steven Freeman thinks about this sort of thing a lot. Freeman is the owner of Angela’s Pasta and Cheese Shop in Manchester, and he takes burrata very seriously. Even more so the stracciatella that it is filled with.
“If you love burrata, you will lust after stracciatella,” he assures me.
He is feeling extremely ardent about stracciatella at the moment, because after many, many months of trying to get his hands on some, he has finally tracked down a source and has started selling it in his store. He assures me that if I were to eat fresh stracciatella with perfectly ripe tomatoes and pink salt, I might reassess some of my priorities in life.
I buy some stracciatella and hunt down a really good tomato. I take the pair home, thank the tomato for the sacrifice it is about to make, then slice it up and spoon some of the cheese onto it.
Bloody Maria served with sliced tomatoes and stracciatella. Photo by John Fladd.
Freeman wasn’t lying.
I mean, I’m not going to quit my job and abandon my family to run off with a pint of Italian cheese or anything, but it is very, very good. It is intensely creamy and is perfectly set off by the acidity of the tomato.
Which reminds me that we are only a month or so away from tomato season and when the really good tomatoes hit the farmers markets, we should have a tomato party. Or in this case, a brunch.
For the food, I suggest tomatoes, olives and cheese. Perhaps some pumpernickel toast, if you are feeling especially adventurous.
For the beverage, there is really only one logical candidate, when you think about it: bloody marys, or bloody marias, in this case. Contrasting fresh, ripe tomatoes with a perfectly seasoned glass of tomato juice with a hint of tequila in the background will make for an excellent accompaniment to nice people and good conversation.
One Bloody Maria
2 ounces Blanco tequila – again, I prefer Hornitos
4 ounces freshly squeezed tomato juice (see below)
½ ounce fresh squeezed lemon juice
1½ teaspoon prepared horseradish
½ teaspoon miso paste
1 teaspoon of your favorite hot sauce
A pinch of celery salt
A pinch of freshly ground black pepper
Add all ingredients to a cocktail shaker with ice.
Shake vigorously, for longer than you normally would — at least one full minute — to make sure the miso dissolves completely.
Pour into a tall glass and for the sake of all that is good and decent in the Universe, please do not garnish the glass with 72 items. They would only distract from the tomato-ness of the situation.
If you have gotten a decent batch of tomatoes, sitting with pleasant company and actually paying attention to your bloody maria will be a bit of a revelation. A perfectly ripe tomato (see below) is a complex and beautiful fruit. Its natural sweetness and acidity will play off the savoriness of the miso and the bite of heat from your hot sauce.
A Pitcher of Bloody Marias
14 ounces Blanco tequila – 1¾ cups
28 ounces fresh squeezed tomato juice (see below)
3½ ounces fresh squeezed lemon juice
3½ Tablespoons prepared horseradish
3½ teaspoons miso paste
3½ teaspoons hot sauce of your choice
½ teaspoon freshly ground black pepper
½ teaspoon celery salt
If you have a very large jar with a tight-fitting lid, add all the ingredients to that, then seal and shake it vigorously. If you do not own such a jar, add all the ingredients to your pitcher, then blend briefly with an immersion blender. If you do not own a large jar or an immersion blender, add all the ingredients to your pitcher, then mix vigorously with a whisk.
If you have not done so yet, transfer the mixture to your pitcher, then top it off with ice.
Serve in tall glasses and drink while listening to Herb Alpert.
Homemade Tomato Juice
To make the really good stuff, you’re going to have to search through the farmers market for the right person. You can look over the tomatoes themselves, but ultimately you are going to have to put your fate in the hands of the person selling them.
Establish your credentials by telling them that you are making bloody marys — specifically, bloody marias. He or she will nod, unsmiling, at you. If they ask how many tomatoes you want, get six pounds. That sounds like a lot, but it is what you need.
The tomatoes you get will not be pretty, but like the person you chose to sell them to you, they have seen some things. These will be tomatoes with some mileage on them.
How to juice your tomatoes:
Wash your tomatoes, but don’t bother to core or peel them.
Working in batches if you have to, blitz them in your blender.
Strain them through a fine-mesh strainer.
In a large pot, bring the tomato juice and two teaspoons of salt to a boil.
Remove from heat and chill overnight in the refrigerator.
Tomatoes have a naturally occurring enzyme that kills off a lot of their flavor if they are exposed to cold temperatures. Bringing the juice to a boil neutralizes those enzymes and allows some of the more subtle flavors of the tomatoes to remain, even after chilling.
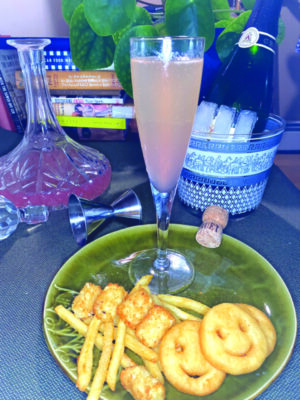
Party #3: A French Fry Party
Last year, we threw a french fry party.
It was supposed to celebrate a crop of really spectacular potatoes that I had raised over the summer, but the potatoes had other ideas and we ended up just buying potatoes and frying them ourselves. The party was extremely successful, but custom-frying that many potatoes turned out to be extremely labor-intensive.
French 75 served with your guests’ french fry favorites. Photo by John Fladd.
So I’ve had an idea: We invite extremely nice and cool people — more or less the same friends we had over last year — but each of them needs to bring a bag of their favorite frozen potatoes and an air fryer if they have one. We set up air fryers at strategic points around the kitchen and dining room, and each guest can make their own custom french fry mixture — hypothetically, a combination of shoelace fries, tater tots and smiley-face fries.
And to drink? A couple of years ago, a major Champagne producer announced that the perfect drink pairing with french fries is — surprise, surprise — Champagne.
I’ll buy that — I can see where a Champagne enthusiast would really like the contrast of the cold, dry bubbly and the hot, salty fries — but I think we can take things a step further, to a classic cocktail called a French 75. Champagne still plays a lead role, but it is backed up by gin, lemon juice and simple syrup. In this iteration I’ve subbed out the simple syrup for a slightly less simple rhubarb syrup, which adds an extra element of complexity to this drink and gives it a pretty, pink color.
One French 75
1 ounce dry gin – I like Wiggly Bridge for this
½ ounce fresh squeezed lemon juice
½ ounce rhubarb syrup (see below)
3 ounces Champagne
In a cocktail shaker, combine gin, lemon juice and rhubarb syrup, over ice. Shake vigorously.
Strain into a Champagne flute. Top with Champagne.
Feel very classy as you drink this, in between snarfing down your fries.
A Large-ish Batch of French 75s
It is totally possible to prepare this drink ahead of time, at least partially, but it requires some more math. A single French 75 calls for three ounces of Champagne. A standard bottle of sparkling wine contains 750 milliliters, or just over 25 fluid ounces. That means that we should prepare enough non-Champagne mixture for eight cocktails for every bottle of Champagne.
8 ounces dry gin
4 ounces fresh squeezed lemon juice
4 ounces rhubarb syrup (see below)
1 bottle Brut Champagne
Using a funnel, fill an empty bottle — a fancy decanter, if you have one — with the gin, lemon juice and rhubarb syrup. Cap and shake to combine.
Chill for several hours, or overnight.
To serve, pour two ounces of the mixture into each Champagne flute, then top with Champagne.
Rhubarb Syrup
Wash, then chop fresh rhubarb to a medium dice, then freeze overnight. Alternatively, buy pre-frozen, pre-chopped rhubarb.
In a saucepan, combine the frozen rhubarb and an equal amount (by weight) of white sugar and a pinch of salt.
Cook, stirring occasionally, over medium heat. Bring the mixture to a boil, to fully dissolve any sugar into solution.
Remove from heat, cover, and allow to steep for 30 minutes.
Strain and bottle. This should keep in your refrigerator for about a month.
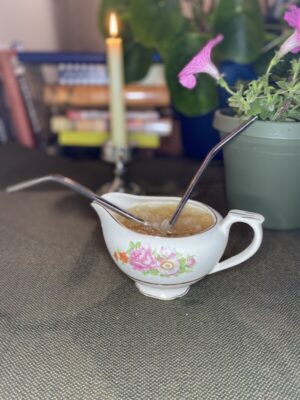
Party #4: Scorpion Bowl for One
“This is all well and good,” you might say, “if I were a Party Person. I used to think I liked parties, but at this point in my life, after a long week at work, the only socializing I want to do is with my houseplants.”
That’s a fair point. Let’s see what we can do for you.
A Scorpion Bowl for One (and maybe your houseplant). Photo by John Fladd.
Many of us went through a phase in our youth of ordering absurd numbers of absurd drinks. Perhaps the most absurd of those drinks was the Scorpion Bowl.
Scorpion Bowls — a mixture of fruit juices and injudicious amounts of alcohol — were always served in elaborate bowls with several straws. The conceit of the cocktail is that it was supposed to be shared with a group of friends. In point of fact, I don’t think I’ve ever actually seen anyone sharing one.
But can we re-engineer a Scorpion Bowl to bring that same sense of adventure to an evening with the houseplants, without the dread of danger that accompanied it in our youth?
A Traditional Scorpion Bowl
2 ounces fresh squeezed lime juice
4 ounces fresh squeezed orange juice
1½ ounces simple syrup, or better yet, rhubarb syrup (see above)
2 ounces orgeat (almond syrup)
2 ounces brandy
4 ounces dry gin
4 ounces golden rum
Divide the amount of ice that you would normally put in your pitcher in half. Put one half in your pitcher.
Add all the ingredients to the ice in your pitcher.
Wrap your remaining ice in a tea towel. Beat it mercilessly with a blunt object, until the ice is shattered into several different-sized pieces.
Add the brutalized ice to your pitcher and stir to combine all ingredients together.
Pour into a large bowl or flower vase and garnish with several oversized straws to help sell the lie that this will be shared.
A Scorpion Bowl for One
⅔ ounce fresh squeezed lime juice
1⅓ ounces fresh squeezed orange juice
½ ounce simple or rhubarb syrup (see above)
⅔ ounce orgeat (almond syrup)
⅔ ounce brandy
1⅓ ounces dry gin
1⅓ ounces golden rum
Combine all ingredients in a cocktail shaker.
Wrap 15 or so ice cubes in a tea towel and shatter them with a blunt object.
Add the shattered ice to the shaker and shake your cocktail thoroughly.
Pour unstrained into a tiki glass or other whimsical container. Drink with one straw.
The genius of a Scorpion Bowl is that someone very carefully made a list of classic Tiki drink ingredients and chose seven that complement each other beautifully. The limes are sour and acidic. The oranges are sweet and acidic. The syrups smooth out the acidity, which in turn keeps the syrups from making things sickly sweet. Almond is a classic, get-along-with-everybody ingredient and serves as a bridge between the different liquors, which might not get along with each other otherwise.
Party #5: Just You and Jackie O’
“Alas,” I hear you sigh. “Even that is a little more intense than I was looking for. I want something I can enjoy with a good book in the hours after I load the kids on the bus to summer camp. Do you have anything like that?”
The Jackie O’s Rose, for a quiet moment. Photo by John Fladd.
As it happens, I do. Let’s set you up with a Jackie O’s Rose.
Think of this as a rose-kissed daiquiri. It’s a combination of standard daiquiri ingredients — white rum, simple syrup and lime juice — with a drop or two of orange curacao and a hint of rose water. The lime and the rum are extremely refreshing, and the rose water makes it a tiny bit exotic. It’s a very good sitting-by-yourself cocktail. It asks nothing of you. It just sits with you and enjoys your company.
Jackie O’s Rose
2 ounces white rum
½ ounce orange curacao
1 ounce fresh squeezed lime juice
½ ounce simple syrup
½ teaspoon rose water
Combine all ingredients in a cocktail shaker, and shake with ice.
Pour into any glass you choose. Strain the ice out if you want to, or leave it in. This is a very undemanding drink.
Drink in calm and silence.
A Pitcher of Jackie O’s Rose
20 ounces white rum
5 ounces orange curacao
10 ounces fresh squeezed lime juice
5 ounces simple syrup
1 ounce rose water
Combine all ingredients in a pitcher.
Top with ice.
Stir.
Serve in a variety of glasses and teacups.
Yes, I know. You wanted to be alone. But what if you’ve got four friends who want to sit quietly with you?
Wherein an intrepid cheese-lover attempts several daring experiments with cheese that lead to delicious and unexpected results
Goat cheese, part 1
It was the thyme that pulled me down the rabbit hole.
I had always said that the title of my first cookbook would be I Don’t Have Thyme For This. Over the years, though, as I’ve done more and more cocktail recipe development, I began to suspect a better title would be, It’s Cocktail Thyme! It’s a great title — cheerful, to the point, a little stupid — in short, much like me.
As I honed my bartending skills and got a better sense for flavor combinations, one small but nagging problem kept raising its head: I had never actually developed a cocktail using thyme. To be fair, it always seemed a bit of a formality; thyme is delicious, cocktails are delicious, it shouldn’t be too tricky to bring the two of them together.
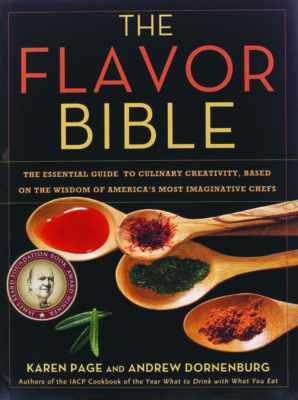
Eventually, I decided to tackle the project and looked up thyme in The Flavor Bible.
I tend to think of thyme as a pretty ubiquitous herb. I mean, I don’t really use it, but you see fancy chefs on TV using it all the time.
The Flavor Bible would beg to differ.
The Flavor Bible.
The Flavor Bible The Flavor Bible by Karen Page and Andrew Dornenburg (Little, Brown, and Co., 2008) is an excellent handbook for anyone playing mad scientist in the kitchen. Essentially, it is the result of a very, very comprehensive poll of extremely thoughtful chefs of what flavors they like to pair with particular ingredients. This book gives you a good idea of what the professional consensus is about any given pairing. If, for instance, you wanted to use coffee in a dish, one or two chefs might suggest pairing it with barbecue sauce. Almost all of them, though, would suggest using it with chocolate. It gives you a sense of which combinations are classics and which are a little more avant-garde.
Overwhelmingly, the most popular pairing that chefs recommend with thyme is goat cheese.
Goat cheese.
How absurd. Clearly, that wouldn’t work in a cocktail. What kind of depraved thrill-seeker would drink a goat cheese cocktail? I would have to try something else.
What else do the chefs suggest to go with thyme?
Carrots, cod or eggplant.
So — goat cheese, huh?
One problem with using goat cheese in a drink is that you can’t just drop a dollop of it into a cocktail shaker and expect it to mix well with the other ingredients. The fat in the cheese would be reluctant to mix with the other liquids without some sort of emulsifier to help it along.
You’ve heard the expression that oil and water don’t mix. Not only is this true, but it can make life difficult for a cook. A good example of this is salad dressing. A classic oil-and-vinegar dressing does not want to mix and must be shaken together vigorously, and used immediately, before it starts to separate. An emulsifier is some ingredient that helps the oil play nicely with other liquids. The classic example is a beaten egg. The fat in a raw egg yolk will latch onto oil molecules readily, while the proteins in the egg white will provide a bridge to water-based fluids.
A goat cheese-based cocktail is a big ask to begin with, without bringing a raw egg on board.
Another approach might be to go in a milkshake direction — a sort of savory mudslide, perhaps. Unfortunately, I didn’t think of that at the time and got distracted by sort of a culinary sleight-of-hand: fat washing.
The basic theory behind fat-washing is that almost any compound that is fat-soluble is also alcohol-soluble. For the past few years, high-end bartenders have been using that chemical loophole to flavor bourbon with bacon, or rum with brown butter. The secret, apparently, is to mix an alcohol with a fatty food, then raise the temperature of the mixture to a couple of degrees above the melting point of the fat you are trying to liberate flavors out of. If you give the fat and alcohol time to get to know each other better, flavors can be exchanged. Goat cheese-infused alcohol is feasible, if you are patient enough.
After several spectacular failed attempts and panicked telephone calls to food scientists (I’m not kidding) I eventually cracked it.
Step 1: Choose a base alcohol
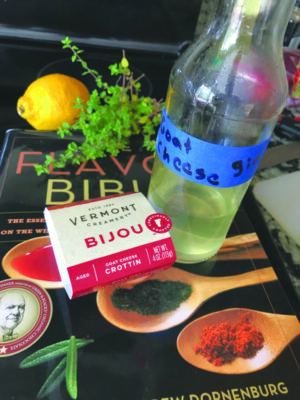
After a lot of thought, I decided to use gin for my experiment. It seemed like the herbal ingredients in a gin would complement the flavor of goat cheese and serve as a bridge to the thyme in a finished cocktail. But which gin?
I asked Andy Harthcock, the owner of Djinn Spirits in Nashua. He seemed a little confused when I told him that I wanted to infuse goat cheese into gin.
“Don’t you mean the other way around?” he asked. (Which actually sounded like a good idea, but I decided to focus on one dangerously ill-conceived project at a time.)
I assured him that I actually was planning to flavor gin with the cheese. He admitted that this was a first for him, but on reflection he had some thoughts about how to go about it.
“You probably don’t want a really high-end gin for this,” he told me. “Any subtle flavors are going to be totally blown out by the goatiness of the cheese.” He advised me to try a heavily botanical gin. “I think you’re probably going to have to eat a round of cheese with several different labels and see which ones stand up to ‘The Goat.’”
Goat Gin. Photo by John Fladd.
So, I did.
After comparing eight different gins, I discovered that Harthcock was right – the two most botanical gins held up to the flavor of the goat cheese the best; in this case, Djinn Spirits’ Original Gin and Drumshanbo Gunpowder Gin. The Djinn gin was extremely botanical and was able to meet the cheese on equal terms. The Drumshanbo isn’t especially botanical but has its own very forceful personality. Either of them would work well.
Step 2: Choose a cheese.
After some trial and error, it turns out that you will need the strongest, “goatiest” cheese available. In this case, I went with Bijou Crottin by Vermont Creamery.
Step 3: Combine the gin and stinky cheese in a zip-lock bag and smoosh it up — a technical term — until it is thoroughly combined. Grope it shamelessly.
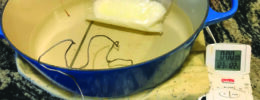
Step 4: Heat the mixture to 120°F (49°C) — the melting point of goat cheese — and leave it at that temperature for four hours. A sous vide tank would make this much easier, but you can do much the same thing with a plastic cooler and a thermometer, replacing hot water every 20 minutes or so to keep the water temperature fairly constant.
A water bath can act as a substitute for a sous vide. Photo by John Fladd.
Sous vide A sous vide water bath is a piece of equipment originally developed for use in scientific and medical labs. It keeps a tub or pot of water at an exact and consistent temperature. You could bathe a bag of lamb chops at 135º, for instance, and walk away secure in the knowledge that it would cook to a perfect medium-rare, and stay there.
Step 5: After a four-hour soak, remove the bag of cheese gin from its bath and put it in a bowl somewhere out of the way for 72 hours. Once or twice per day, you might want to smoosh the bag around in your hands to remix the infusion and keep the cheese in solution.
Step 6: On the big day, thank your bag of gin for working so hard for you, then strain it through a fine-mesh strainer. There will be a surprising amount of cheese solids — or casein — left behind.
Step 7: Filter the cloudy liquid through a coffee filter.
Goat Cheese Gin Recipes:
The Relentless March of Thyme. Photo by John Fladd.
The Relentless March of Thyme
Ingredients
2 ounces goat cheese gin (see above)
1 ounce fresh squeezed lemon juice
½ ounce thyme syrup (see below)
2 sprigs of fresh thyme
Combine all ingredients, with ice, in a cocktail shaker. Shake brutally, until you hear the ice shatter.
Strain into a martini glass.
This is a goat-forward, thyme-y, martini-like cocktail. It has a bit of sweetness from the thyme syrup, but it has a clean, cold taste that picks up on the multi-stage nature of the gin and comes in waves.
Thyme Simple Syrup
Ingredients
1 cup white sugar
1 cup water
10 grams / ⅓ ounce fresh thyme (about half a plastic clamshell package from the produce department at the supermarket)
Combine the sugar and water in a small saucepan, and bring to a boil. Let the syrup boil for 10 or 15 seconds to make sure that all the sugar has been dissolved into solution.
Remove from heat, add the thyme, and cover with a plate. Let the thyme steep for 30 minutes.
Strain into a bottle and store in your refrigerator.
Die Goat-erdämmerung
Ingredients
2 ounces goat cheese-infused gin
1 ounce thyme simple syrup
1 ounce lemon syrup (see below)
Plain seltzer
Add gin, thyme syrup and lemon syrup to a cocktail shaker, with ice.
Again, shake brutally, until the ice shatters, or the world ends.
Pour, with the ice, into a tall glass and top with seltzer. Stir gently.
This take on goat-cheese gin is sweeter and more amiable than its martini-ish baby brother. Instead of shouting, “HEY!! GOAT CHEESE!!” at you, it soothes and persuades you: “Oh, this is lovely. Oh, there’s some lemon; you like that, don’t you? What’s that in the background? Thyme, you say? Oh, that’s perfect. You know, this is just goaty enough.” It is perfect for dedicating your first weekend of deck-sitting.
Lemon Syrup
Zest some lemons — any amount; don’t let some recipe order you around on this.
Juice the lemons into a small saucepan. Add an equal amount of white sugar, and bring to a boil.
Remove from heat, add the zest, and allow the mixture to steep, covered, for 30 minutes.
Strain, bottle and refrigerate.
“OK,” one might say, “so this whole goat cheese gin thing is very clever and sounds fun, but what if I’m in a cheesy mood, but don’t want to take a leave of absence from work and get a degree in Laboratory Science to make something? “
Ah! You’re in luck!
Goat cheese. part 2
One of my go-to sources for baking recipes is the King Arthur website. Every bread, brownie or pizza crust that they post a recipe for has been rigorously tested and is pretty much bullet-proof. One of my favorite aspects of their recipes is that the amount of each ingredient is listed by volume (cups, etc.) and by weight (ounces and grams). I find that weighing ingredients is easier and more accurate than scooping them with measuring cups.
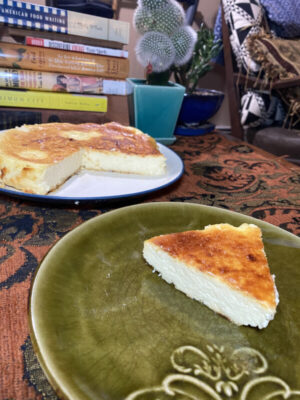
One of their most recent projects has been something called a Basque cheesecake.
Cheesecake-making can be nerve-wracking. You want your cheesecake to be done all the way through, but not overly baked. You worry about it heating unevenly and developing a crack across the top. You worry about whether you should have used a water bath or not, and if you did, should you have heated the water up first? And then, when you finally finish baking, cooling, and depanning it, you will serve it to someone who shrugs and says, “Yeah. It’s OK,” because it doesn’t fit their mental model of what a cheesecake should be. And then you have to worry about hiding a body.
A Basque cheesecake, on the other hand, is meant to be rustic-looking. You are supposed to bake it at an unreasonably high heat, until the top is deeply, deeply caramelized; it’s supposed to look over-baked.
This makes its deliciousness somewhat surprising and gives it a bigger impact.
I’ve taken the original recipe and tweaked it to accentuate its cheesiness. I’ve replaced cream cheese with a mild goat cheese and dramatically reduced the sugar in this recipe by about a third, to make its tartness pop. It is easy. It doesn’t take long. It is a tremendous confidence-booster.
Basque Cheesecake
Basque cheesecake. Photo by John Fladd.
Ingredients
24 ounces / 685 grams soft, mild goat cheese
7 ounces / 200 grams white sugar
5 eggs
6 ounces /170 grams heavy cream
½ teaspoon coarse sea salt
Heat oven to 500º.
Line a springform pan with parchment paper.
Combine all ingredients in a blender, then blend for five minutes.
Pour into the springform pan, trimming off any excess parchment paper.
Bake for approximately 45 minutes, until dark.
Cool for at least one hour, then remove from pan.
Eating this tart, crumbly cheesecake is a meditative experience. It is delicious. The sharp taste of the goat cheese provides a mouth-watering sourness that seems a little citrusy, but is also emphatically not. The pared-down nature of this dish makes it perfect for paying very close attention to every bite, and leaving you fully in the moment.
And now perhaps you’re thinking: “That does sound good, but my mother-in-law is famous for her cheesecake, and I’m afraid that if I made this, word would get to her, she would take it as some sort of criticism, and my quality of life would degrade significantly. Do you have something else?”
OK. As it turns out, yes I do.
Digital scale Once you get used to it, a digital scale becomes an indispensable tool in your kitchen. When you need to add multiple ingredients to a bowl or a saucepan, for instance, you can put the container on the scale, then add each ingredient by weight, using the tare function to zero out the scale and avoid doing math. You stop having to wonder what “tightly” or “loosely” packed means in a given context. Your baking becomes much more consistent.
Smoked cheddar
One of my great passions is shopping at flea markets. I have a particular fondness for finding obscure cookbooks. Our kitchen shelves long ago ran out of room to hold all of them, and I am about three volumes away from filling a bookcase in the living room. Their mere existence is something of a trial for my wife, who feels that by taking up valuable space but never actually being cooked from, they are openly mocking her.
“Can we get rid of some of these?” she asks me two or three times a year. “Are you ever going to actually make any Bengali street food?”
“You never know, Baby,” I reply with an air of mystery. “You never know.”
And the scary thing for her is that she doesn’t know. She could be going through her day, not suspecting a thing, then suddenly catching a whiff of the exotic but slightly alarming scent of asafetida from the kitchen.
Last week’s purchase was the promisingly titled Adventures in Cooking by Rasmus Alsaker, M.D., published in 1927.
I was fully prepared to navigate old-fashioned recipes calling for vague measurements, like “a knob of butter, the size of a pullet’s egg,” or “a medium oven.” Doctor Alsaker was a man of science, though, and his measurements were precise. What I was not prepared for was his enthusiasm for pimientos. At a rough estimate, he calls for pimientos in approximately 5,000 recipes. I don’t know what was going on pimiento-wise in 1927, but I have used our own relative pimientolessness as license to modify his recipe for the very promising-sounding:
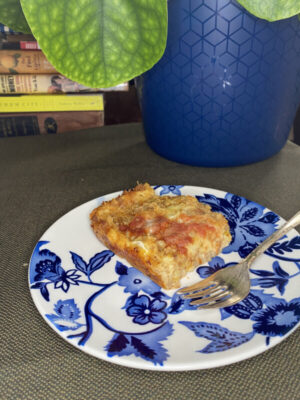
Cheese Crumb Pudding
Ingredients
Cheese crumb pudding. Photo by John Fladd.
2 cups / 110 grams bread crumbs. (I feel like you could blitz Triscuits in the food processor in lieu of fresh bread crumbs.)
2 cups / 250 grams shredded, smoked cheddar. I went with an Australian brand called Old Croc, and I was not disappointed.
½ teaspoon dry mustard
½ teaspoon freshly ground black pepper
3 Tablespoons jarred salsa (This is playing pinch hitter for the pimientos.)
2 eggs
1 cup / 225 grams whole milk
¼ teaspoon paprika
Heat oven to 375º.
Generously butter a 9×9” baking dish.
Mix the mustard, pepper and paprika together in a small dish.
Spread 1/3 of your crumbs over the bottom of the baking dish. Look at them critically. Do they look cold and lonely?
Cover them with a blanket of cheddar — half the cheddar. Sprinkle half of the seasoning on top of the blanket. You know — like a blessing.
Repeat, with another layer of crumbs, the rest of the cheddar, and the rest of the seasoning. Top with a final layer of crumbs.
Mix the milk, eggs and salsa; gently pour over the top of the guys you already have in the baking dish.
Bake for 30 minutes.
Allow to cool for 10 minutes before serving.
The center of this savory pudding is tender, custardy and smoky. The edges are where it really shines though. If you are, like all good Americans, a fan of brownies from the edge of the pan, the chewiness of the pudding border will be something of a revelation. You could describe this as being a bit like a very good macaroni and cheese without the macaroni.
Or, in the words of my own sullen teenager, “Why didn’t you ever tell me you could cook something like this?”
But perhaps you’re thinking: “I can’t make that. Mercury is in retrograde.”
OK, now you’re just messing with me, but I’m going to call your bluff.
Electric whisk Most recipes that call for a custard will include very finicky instructions on how to temper beaten eggs with hot milk, then whisk the warmed-up egg mixture back into whatever you are cooking. Then comes possibly the most frustrating cooking instruction ever written: “cook, stirring constantly, until the custard coats the back of a spoon.” I don’t know what kinds of cooking prodigies can actually manage that. I’ve been trying to perfect that particular maneuver for over 20 years and I can still never tell when I’m closing in on “soupy scrambled eggs” territory.
The game-changer for me was finding a whisk with an integrated thermometer in it. Some research revealed that ice cream base should be heated to approximately 175º, so now I can just whisk my custard thoroughly until I hit that temperature.
Blue Cheese
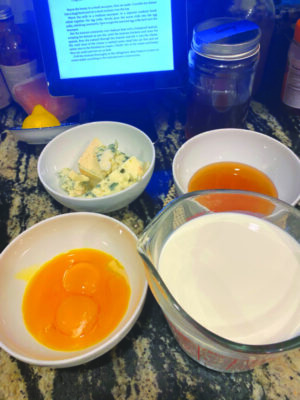
Honey-Roquefort Ice Cream
Ingredients
8 Tablespoons / 120 grams clover or wildflower honey
4 ounces Roquefort or blue cheese
2 cups / 500 grams half & half
4 egg yolks
Making honey-roquefort ice cream. Photo by John Fladd.
The brilliant thing about this recipe — aside from its unexpected excellence — is that it only has four ingredients.
Crumble the blue cheese into a bowl, in small pieces.
Combine the honey, half & half and egg yolks in a small saucepan.
Whisking constantly, heat the custard (because that is what this is — a loose custard) over low heat until it reaches 173º. (We’re actually shooting for 175º, but the temperature will continue to rise a few degrees after you remove it from the heat.)
Pour the very warm custard through a fine-mesh strainer, over the blue cheese.
Whisk until the blue cheese almost completely dissolves. It is OK if there are a few small, surprise pieces of cheese left in the mixture.
Chill the mixture, then churn in your ice cream maker, according to the manufacturer’s recommendations.
You may have heard that some avant-garde chefs have been experimenting with savory ice creams. This is not one of them. This is a fully sweet dessert ice cream that just happens to be blue cheesy. The honey provides a muskiness that complements the earthy, salty flavor of the cheese. It is possibly the most creamy ice cream you have ever tried.
Do you have to be stout of heart to try it? Do you have to look Adventure in the eye and shake its hand?
Yes, and yes. But you will enjoy this, and you will come out the other side of the experience slightly changed.
But you know what would make this honey-ish, cheesy ice cream even better?
Cake.
Consulting The Flavor Bible again shows that a great many chefs like the combination of apples with blue cheese. Who am I to argue with a great many chefs?
Apple Bundt Cake
Ingredients
3 Granny Smith apples, peeled and diced — about 440 grams
3 cups / 360 grams all-purpose flour
1 teaspoon baking soda
2 teaspoons ground cinnamon
½ teaspoon freshly grated nutmeg. If you’ve never grated your own nutmeg, try it. You’ll never go back to pre-ground again.
½ teaspoon salt
1½ cups / 360 grams sour cream
1½ cups / 275 grams white sugar
½ cup / 64 grams brown sugar
3 eggs
Apple bundt cake. Photo by John Fladd.
Heat your oven to 325º.
Paint the inside of your Bundt pan with Cake Goop (see sidebar)
Whisk together the flour, baking soda, cinnamon, nutmeg and salt.
In another bowl, mix the sugars and sour cream. Mix in eggs, one at a time.
Mix in the diced apples by hand.
Pour mixture into your pre-gooped Bundt pan. Lift the pan and bonk it on your counter 10 times.
Bake for 70 minutes or until it reaches an internal temperature of 200º F.
Remove from the oven. Let it cool for 20 minutes, then remove from the pan.
This is an outstanding Bundt cake. The apples are tart and still a tiny bit crunchy. The cake itself is rich but not too sweet. The nutmeg and cinnamon shine through.
And it is extremely good with blue cheese ice cream.
But still, perhaps, you say: “That does sound good. Unfortunately, I’m not allowed in the kitchen since the Lasagna Incident.”
I hear you; we’ve all been there. I’ve got you covered.
Bundt cake Bundt cake might be the Cake Lover’s ideal cake. At its best it is moist, flavorful, not too sweet, and free of frosting distractions. That goodness comes at a cost, however; it presupposes that you can get your cake out of the pan. There are few heartbreaks in life on a par with inverting a Bundt pan only to find that you’ve left half a cake in it.
This can, happily, be avoided. For months, I have been hearing rumors online about “Cake Goop.” It is a mixture of equal parts solid shortening, vegetable oil and flour. Word on the street was that if you paint the inside of your Bundt pan with this stuff, your cake won’t stick.
It’s true.
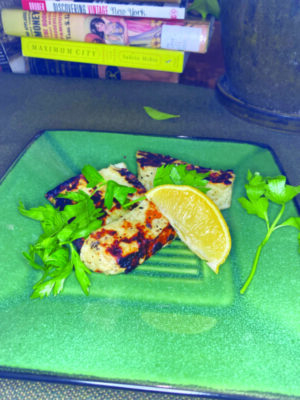
Haloumi
There is a Greek sheep’s-milk cheese hidden away in the specialty cheese section of your supermarket called haloumi.
Charcoal-grilled haloumi. Photo by John Fladd.
In many ways, it is much as you’d expect it to be — salty, mild-flavored and fairly modest. If you taste a little, it might seem a little chewy, but not outrageously so. If it were a person, it would be named Melvin.
You wouldn’t suspect him of hiding a superpower.
Haloumi has an extremely high melting point. Oh, you could force the issue and make it melt, but you would probably need a blowtorch to do it. At temperatures that would frighten other cheeses out of the room, haloumi hums softly to itself and minds its own business.
So nicely in fact, that you can charcoal-grill it.
Charcoal-grilled Haloumi
1. Light the charcoal in your grill.
2. Thoroughly grease a grill pan. Use an oil with a high smoke point. This means one that won’t catch on fire when things get serious. Use any oil you would fry with. I like ghee — clarified butter — but shortening or peanut oil would also work really well.
3. Open packages of haloumi and cut it into finger-sized pieces.
4. Make a cocktail and go back outside to watch the coals.
5. When the coals are red and white and feeling all right, grill the haloumi over them in the pre-greased grill pan. Turn the cheese frequently with tongs. It will only take a few minutes to char-grill them beautifully.
6. Serve with a fresh parsley and a squeeze of lemon juice. A salad would be nice, too.
When I was a kid, once a year — usually on July 4 — my church would hold a big auction. It was the church’s big fundraiser for the year. One year my mom gave me $3 to bid with and I won a mystery box of books. There were a couple of really great pulp adventure novels from the ‘30s in it, as well a truly unexpected piece of literature that I’m pretty sure my mom wouldn’t have approved of, that was extremely educational. It was the high point of my summer.
The men of the church would man the grills — giant 50-gallon barrels split down the middle with industrial grating thrown over the top. They would risk serious burns and smoke inhalation to grill hot dogs, burgers and quarter-chickens. The smoke, barbecue sauce and the constant threat of danger made that the best chicken I ever had.
What does that have to do with grilled haloumi?
Not much, except that this will also make you very, very happy. The smoke and salt and mild char on the cheese will be a bit of an epiphany. The acid from the lemon juice will add just the tang it needs to put it over the top.
It might even get you kitchen privileges again.
At last, you might think, “I’m feeling a bit overwhelmed. All this cheesiness is just a little exotic for me. I’ve had a rough week and I’m feeling a little fragile. You said ‘grilled cheese’ and you got my hopes up.”
I understand completely.
Blowtorch You know that blowtorch we talked about a couple of minutes ago? It turns out that a plumber’s blowtorch is the perfect tool for lighting charcoal without leaving a lighter-fluid taste behind.
Colby-jack
Do you know who else does?
Marcie Pichardo, the owner of Prime Time Grilled Cheese,a restaurant in Manchester specializing in grilled cheese sandwiches. She spends a lot of time thinking about cheese — according to her, approximately 18 hours a day.
Cheese might be the glue that keeps society from splintering apart, she says. “Cheese holds things together. In the house I grew up in, cheese is the thing that held us together as a family. It’s the glue that holds a recipe together.’
According to Pichardo, the key factor to consider when you are putting together a grilled cheese sandwich is consistency. “That’s the most important reason why we choose a particular cheese for a sandwich,” she says. “Think of a pizza. If you put cheddar on it, it would taste good, but it would go everywhere! That’s why you go with a mozzarella.”
She agrees that the Platonic ideal of a grilled cheese sandwich involves (1) white sandwich bread, (2) American cheese (“It’s gooey in the middle and crispy on the outside.”) and (3) being grilled in butter. “That’s the benchmark,” she says.
She’s not wrong.
Platonic ideal The concept of a “Platonic ideal” states that for every concept, there is a perfect theoretical example of it that all real world examples are measured against — the most perfect blue sky, the most exquisite jazz trumpet solo and the most grilled-cheesiest grilled cheese sandwich.
And yet, I’d like to submit an idea for your approval:
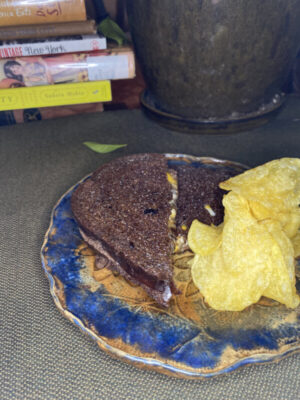
A grilled colby-jack on pumpernickel, with caramelized onions.
You know how to make a grilled cheese sandwich. I know you know. You know that I know that you know.
Still…
A grilled colby-jack on pumpernickel, with caramelized onions. Photo by John Fladd.
Butter one side of each slice of pumpernickel generously with softened butter. It’s tempting to just drop a dollop of cold-from-the-fridge butter in the pan, melt it, then swirl the sandwich around in it, but it never works out as well as buttering the bread itself.
Assemble the sandwich completely before putting it in the pan. It is always tempting to put the first slice of bread in by itself, then add the cheese and the other slice in stages, as you finish them, but your finished sandwich will be cooked evenly on both sides if you observe traditional grilled-cheese protocols.
Watch the sandwich with a jaded, suspicious eye. The pumpernickel will try to fool you about how grilled it is. Do not fall for its tricks. Because the bread is so dark to begin with, you cannot rely on color to let you know when to flip it.
Flip the sandwich experimentally, and gently tap the surface of the bread with the edge of your spatula. When it feels grilled, it is grilled.
Do not make the omelet mistake of waiting until the cheese is thoroughly melted before removing your pan from the heat; your sandwich will be overcooked. Take it out of the pan as soon as the bread is ready. The grilled bread will be warm enough to finish melting the cheese on its own.
We should throw a grilled cheese party. We could all wear t-shirts that read “Proud to Be Crusty.” We could rig up a cheese piñata full of Baby Bells. June 4 is National Cheese Day.
There is still time.
Featured photo: Die Goat-erdämmerung. Photo by John Fladd.
When you were in school, did you ever have one of those teachers who always went off-topic?
You know the type: He was supposed to be lecturing on the Dewey Decimal System or something, and he would tell the class a story about a haberdasher he used to know in Cleveland, who had nine fingers and a dog named Sylvia.
And yet — somehow — he would end up circling around and making an important and pertinent point about the actual subject. Anyway, this is one of those stories:
My teenager and I had just finished our Taekwondo class and were driving home. The Teen asked if we could stop at our favorite convenience store, because if she didn’t eat some chocolate-covered pretzels immediately, she would die, messily in the passenger seat.
I grabbed a diet orange soda and was waiting at the front counter, while The Teen gave the variety of pretzels the intense scrutiny they required.
Two clerks were on duty. I know one of them pretty well — I’m a regular customer — but the other was clearly new. I nodded at each of them.
We had just come from martial arts class, and it was a sparring week, so not only was I in uniform and unpleasantly sweaty, but I had also just taken a beating.
“Rough week?” my regular clerk asked.
“Man!” I replied. “I dropped some bad powdered unicorn horn over the weekend. The guy said it was pure, but I think it was cut with some of that South Korean stuff….”
“I hear you,” my friend said.
I continued. “I’ve got a cousin who managed to score me some pixie dust on Monday, and that helped a little, but I kept floating a foot off the couch, and I couldn’t play XBox properly.”
“We’ve all been there,” Clerk No. 1 said, comfortingly.
At this point, Clerk No. 2 was extremely confused.
“I mean,” I said with real frustration in my voice, “I’m just trying to stop the tentacles. You know what I mean?”
Clerk No. 1 nodded understandingly and patted my shoulder. Clerk No. 2 started to say something, then thought better of it. The Teen found her snack. I paid, and we left.
As we walked out the door, I heard Clerk Number Two ask, “Is he always like that?”
“Yeah, pretty much,” said his colleague.
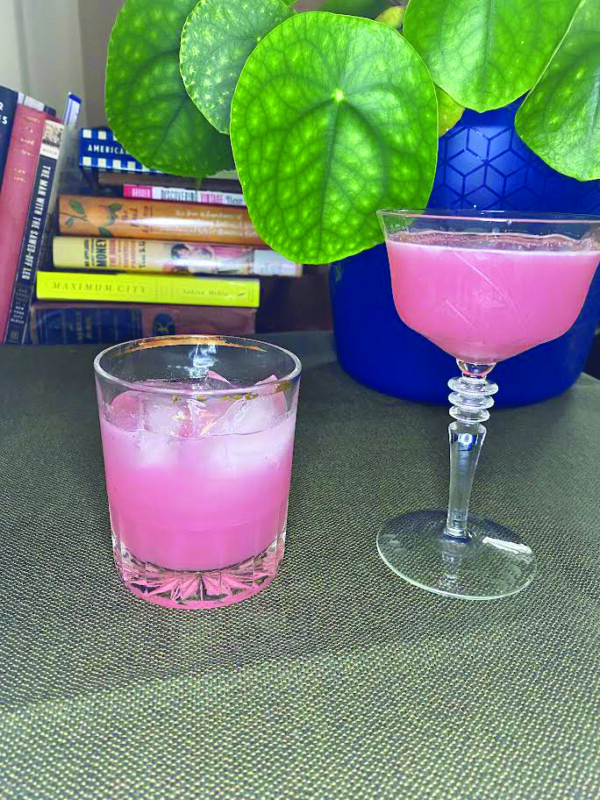
This is my point: It’s been a rough week and you could use a pretty pink drink.
Rhubarb Margarita
2 ounces blanco tequila — I like Hornitos.
1 ounce fresh-squeezed lime juice
¾ ounce rhubarb syrup (see below)
Add all ingredients and 4 or 5 ice cubes to a cocktail shaker. Shake vigorously.
Pour unstrained into a rocks glass.
Regardless of how you start this drink, it will have an effect on you. I am a grumpy, walrus-like man in late middle age. By the time I finished shaking this, I found myself wearing a tutu and sparkle-shoes.
This is a tart, refreshing take on a traditional margarita. The lime juice and tequila are the dominant tastes, but there is a tart fruitiness in the background that you would not be able to identify if you were drinking this blindfolded — which, for what it’s worth, sounds like a really great way to spend a weekend, making new friends. That’s the rhubarb. It’s delicious but prefers to stay in the background, steering this cocktail in delicate and happy directions.
“Yeah, that’s really pretty and all, but I’m not the world’s biggest fan of tequila.”
Fair. Replace the tequila with white rum, and you’ll have something we might call a Blushing Daiquiri.
“What if I’m 9 years old?”
You’re not supposed to be reading cocktail columns. Have Dad replace the alcohol with club soda. It will be the Very Prettiest Soda.
Rhubarb Syrup
Combine equal amounts of frozen diced rhubarb and white sugar in a saucepan. You will be afraid you have made a major miscalculation — it will look like a lumpy pile of sugar. Be stout of heart.
Cook over medium heat. As the rhubarb thaws and cooks, the sugar will draw out a surprising amount of liquid. Bring the mixture to a boil and let it cook for 30 seconds or so.
Remove from the heat, and let it steep for half an hour or so. Strain off the syrup into a bottle for use. Do not discard the rhubarb; it is the base of a superb compote. Squeeze a little fresh lemon juice into it and you will have a fantastic topping for toast or ice cream.
Featured photo. Rhubarb Margarita. Photo by John Fladd.