Start with an outline and some compost
This is a good time to make plans. If you are willing to spend just 15 minutes a day, every day, from spring to fall you can create an edible showcase for beauty: the splendid look of ripe red tomatoes, multi-colored Swiss chard or glossy green peppers. It’s not nearly as difficult as you think. And unlike maintaining a lawn, you get to eat the results of your labor. Here’s what you need to do:
To grow good vegetables you need sunshine, at least 6 hours a day and preferably more. For most people, the sunniest part of the yard is in the middle of the lawn. A well-maintained vegetable garden can be as gorgeous as a flower garden. And if you like flowers, you can plant some of those in your vegetable garden, too.
Don’t bite off more than you can chew — or weed. A nice lawn garden can be just 10 feet across and 12 feet long. Properly maintained, it will provide you with fresh veggies much of the summer.
Using string and stakes, define the borders of the garden and pry out the sod after cutting it into 1-foot squares with an edging tool or a spade. Use the sod to start a compost pile.
Start early enough in the season — say the first of May — so you can work just 15 or 20 minutes a day for a week or more to get all the grass out. That way you get in the habit of spending time in the garden, but don’t develop blisters or an aching back. Gardening should be fun, not hard work. Still, it can give you a workout without going to the gym.
Your lawn garden will have two raised beds separated by a walkway. Once you have removed the sod, you can just mound up the soil to form beds about 30 inches wide with a walkway up the middle and a 6-inch space between the lawn and the beds all the way around the garden. To do this, (after removing the sod) loosen the soil with a garden fork, shake out the soil and then rake the soil from the perimeter and the walkway onto the beds.
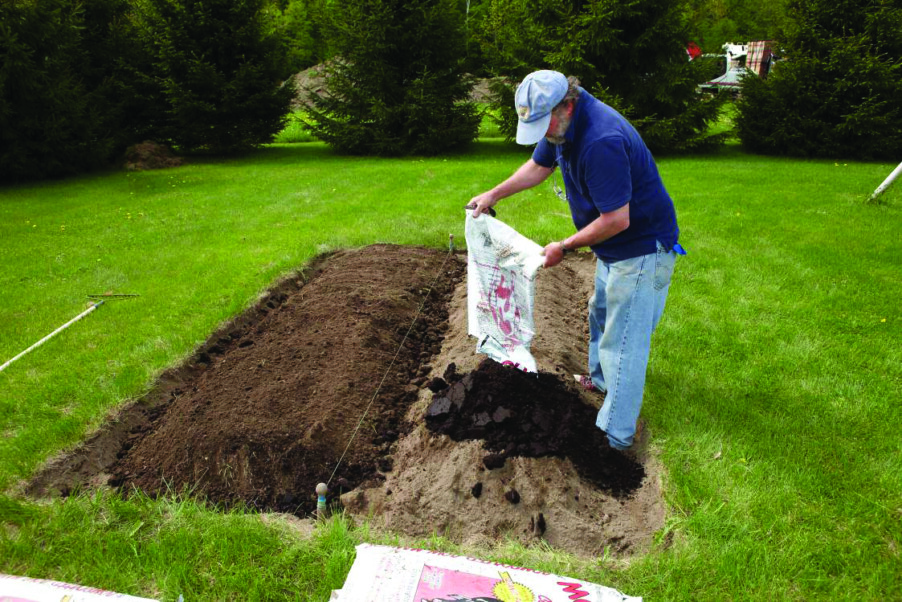
Then spread out five bags of composted cow manure on each bed (each bag is usually labeled 30 quarts), and work it into the loose soil with your garden fork or favorite hand tool.
Alternatively, you can build wood-sided beds using ordinary 6- or 8-inch-wide planks. For more years of service, 2-inch-thick lumber is even better. Gardener’s Supply (www.gardeners.com) sells a variety of brackets for building raised beds, and I suppose others do, too.
If you build wood-sided beds you will have to buy more filler than if using mounded beds. Most garden centers sell topsoil and compost by the tractor scoop, which is usually two thirds of a cubic yard of material. They’ll dump right into the back of your pickup truck, or even deliver (for a price). I recommend a mix of topsoil and compost, a 50-50 mix.
If you make wood-sided beds you can place them right on the lawn without removing the sod, which saves a lot of labor. Just scalp the grass with the lawnmower and put a thick layer of newspapers over the lawn, then fill the box. Long carrots might hit the bottom the first year, but most other plants won’t be bothered.
What to plant? Make a list of the veggies you like best and that taste best freshly picked. If you plant tomatoes, dedicate at least 24 inches of a row to each plant. And buy those wire cages for your tomatoes, so they won’t flop over and shade out your carrots or broccoli nearby.
I like to plant lettuce seedlings all around the tomatoes at the beginning of the season while the tomatoes are still small. By the time the plants get big, the lettuce will have been harvested and eaten. Run your rows north-south, and plant tomatoes (or any tall plants) on the north end of the garden so they will shade other plants less. Buy some bagged organic fertilizer and stir some in at planting time.
Oh, and about those weeds: The easiest way to prevent a problem is to mulch. Put down six sheets of newspaper and cover it with straw, mulch hay or last fall’s leaves. This will keep the soil dark, turning off the switch that weed seeds have to tell them when to germinate. Mulch also holds in the moisture during dry times. But when a few weeds do turn up — and they will — be sure to pull them before they get big and make more seeds. That’s preventive maintenance.
Gardening is said to be a middle-aged sport. After all, what parent of three toddlers has time to weed? But if you wish to reduce your food costs and feed your family well, a garden is great. And done this way, you can maintain it in 15 minutes a day. I promise. Just keep at it daily, and you’ll be surprised and delighted at how good your garden looks, and how much food you can grow — right in the middle of the lawn!
Featured photo: Adding composted manure enriches the soil. Courtesy photo.